Most AI images are nearly right. The face is off, a sleeve has melted, a hand is wrong. Inpainting re-renders just the part you mask and leaves the rest alone. This workflow does it with Flux Dev and the Impact Pack’s SEGS detailer, which upscales the masked area before re-rendering it, so even a small region comes back with real detail.
The technique works on any subject. Here I take a character image I generated from a sketch (see sketch to art with Flux) and fix it part by part: face, sleeves, legs, torso and the baseball bat.
In short
- Mask one region in the Mask Editor, with a soft brush (hardness near zero).
- MASK to SEGS → Detailer (SEGS): the masked area is upscaled to 512 px, re-rendered with Flux Dev, and blended back.
- Settings: Flux guidance 3.5, 20 steps, denoise 0.60–0.70.
- One part at a time. Save, download, re-upload, mask the next part.
- Expect re-runs: 10–15 for a face is normal.
For a closer look at each node, and a paint-over trick for the hardest hands, see fixing AI hands in ComfyUI. This guide is about using the same setup on a whole image.
The workflow
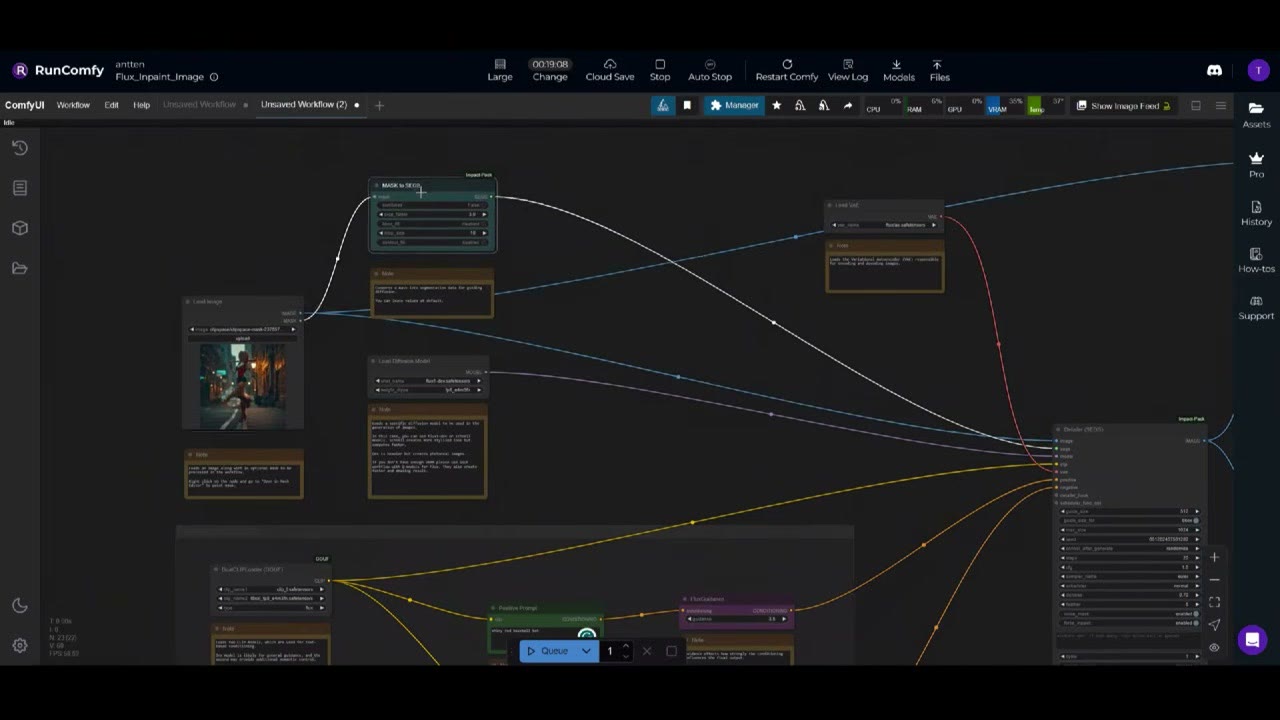
- Load Image: upload the image you want to fix. Right-click it and choose Open in Mask Editor to paint the mask.
- MASK to SEGS (Impact Pack) turns the mask into a segment, isolating that area so it can be upscaled.
- Detailer (SEGS) is the main node where everything comes together. It takes the masked area, which might be only 100 × 100 pixels, upscales it to 512 × 512, and re-renders it there. More pixels let it create a better result. The original image guides it, so you don’t need much of a prompt; it already reads what’s there. Connect the original image too, not only the segments.
- Load Diffusion Model: the full Flux Dev model. The first generation takes about a minute and a half while it loads; after that a run took about 16 seconds.
- Load VAE: Flux’s small autoencoder, which decodes the image from latent space.
- DualCLIPLoader: Flux needs two text encoders, clip_l and t5xxl.
- Positive prompt → FluxGuidance: Flux guidance sets how strongly the prompt controls the image. 3.5 is standard and works well. Connect the negative input too, but leave it empty: Flux doesn’t work well with negative prompts, so describe everything in the positive one.
- Image Comparer and Save Image at the end.
Paint a soft mask
In the Mask Editor, set the brush size with the slider, then turn hardness down to about zero. The default is very hard, and a hard edge leaves visible borders and seams. Paint over the area and click Save.
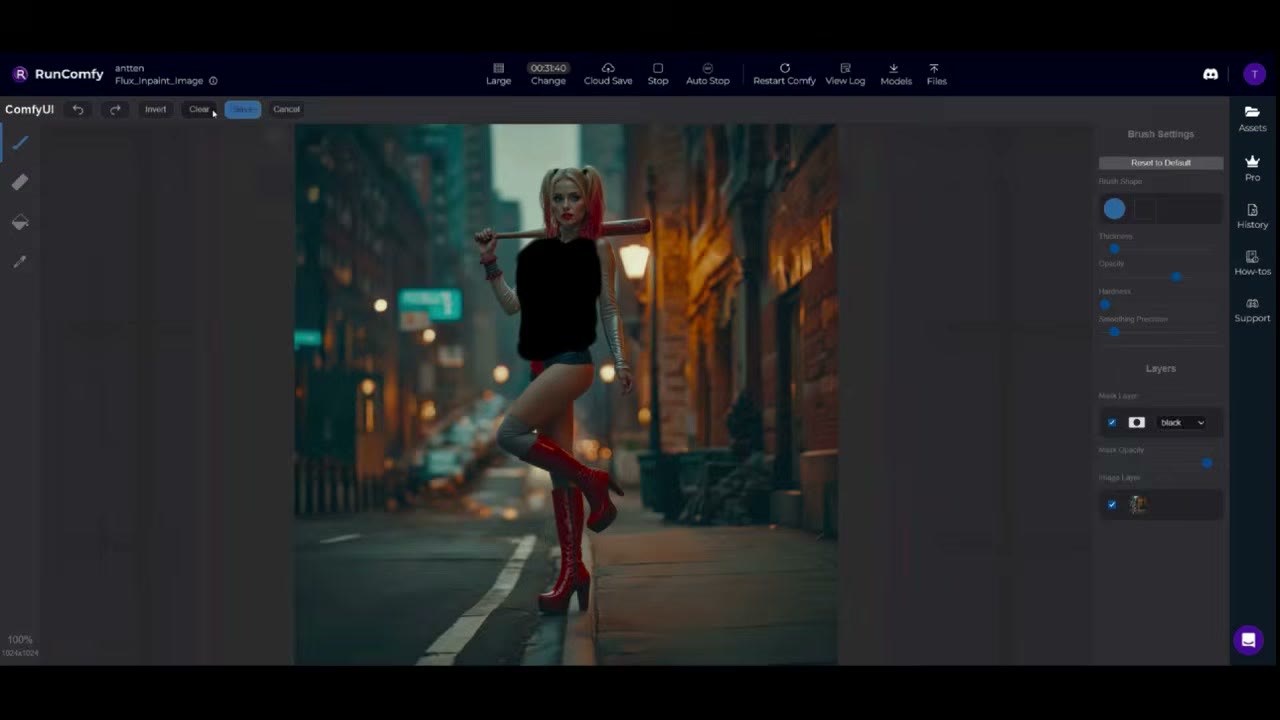
Mask one part at a time: arms, legs, waistline, torso, face, hair, the bat. If you try to do the arms and the legs in one go, the mask grows too big and it messes up the image. It just doesn’t do a good job.
Prompt and settings
The prompt can be very simple. For the face I typed “young beautiful female face, red lips”. Only add more detail if it keeps getting something wrong.
In the detailer:
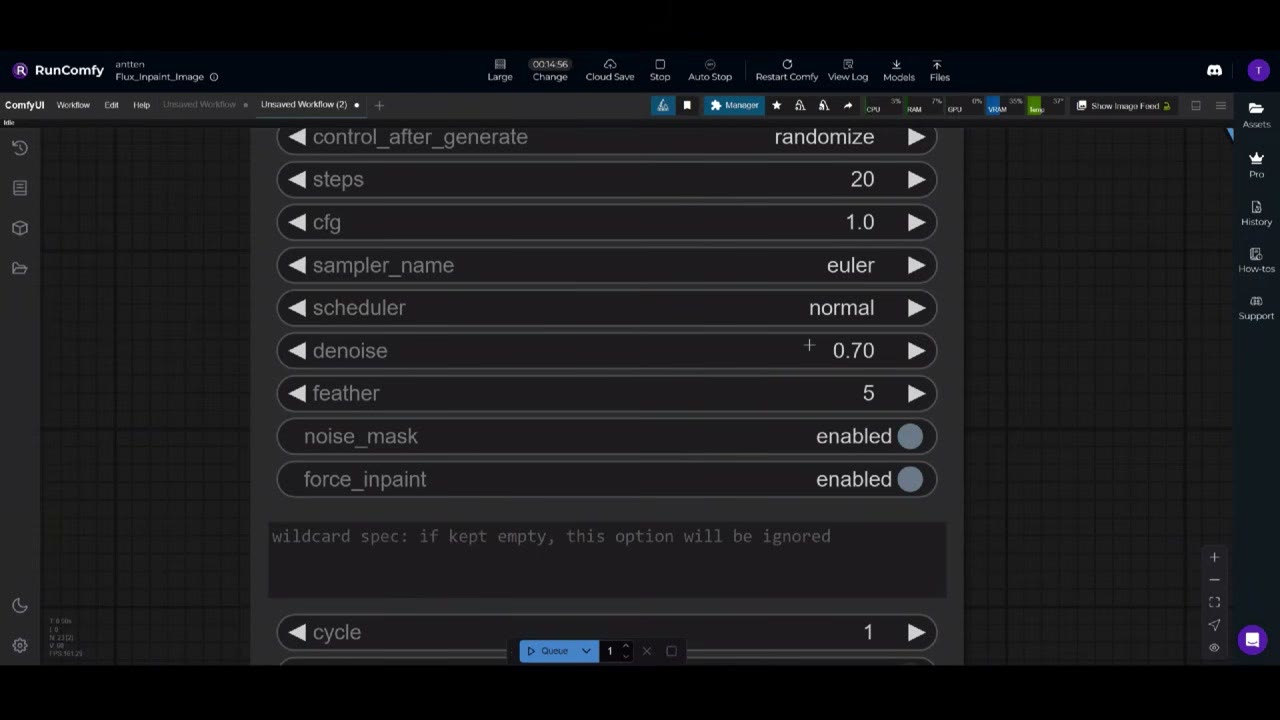
- Seed: random each run. Keep a seed if you want to recreate an image: with the same prompt and settings, someone else gets exactly the same result.
- Steps: 20. The usual range is 20–50, with diminishing returns above 50. Flux is fairly slow, and 20 is fast and high quality.
- CFG: 1.0. Guidance already comes from the FluxGuidance node, so CFG has no effect here; leave it.
- Denoise: 0.60–0.70. How much the area may change. This range gives the model enough freedom without changing it too much or too little. I got there by experiment, after hundreds or thousands of generations.
Run, save, re-upload, repeat
Every run gives a different face, so keep re-running until one works. Results go to ComfyUI’s output folder; the save node’s filename prefix (I used flux_gen) makes them easy to find.
To work on the next part, the current result has to become the input. I download the image and upload it again in Load Image. (If you know a better way to reuse it inside RunComfy, tell me.) Uploading a new image deletes the mask, so open the Mask Editor and paint the next area.
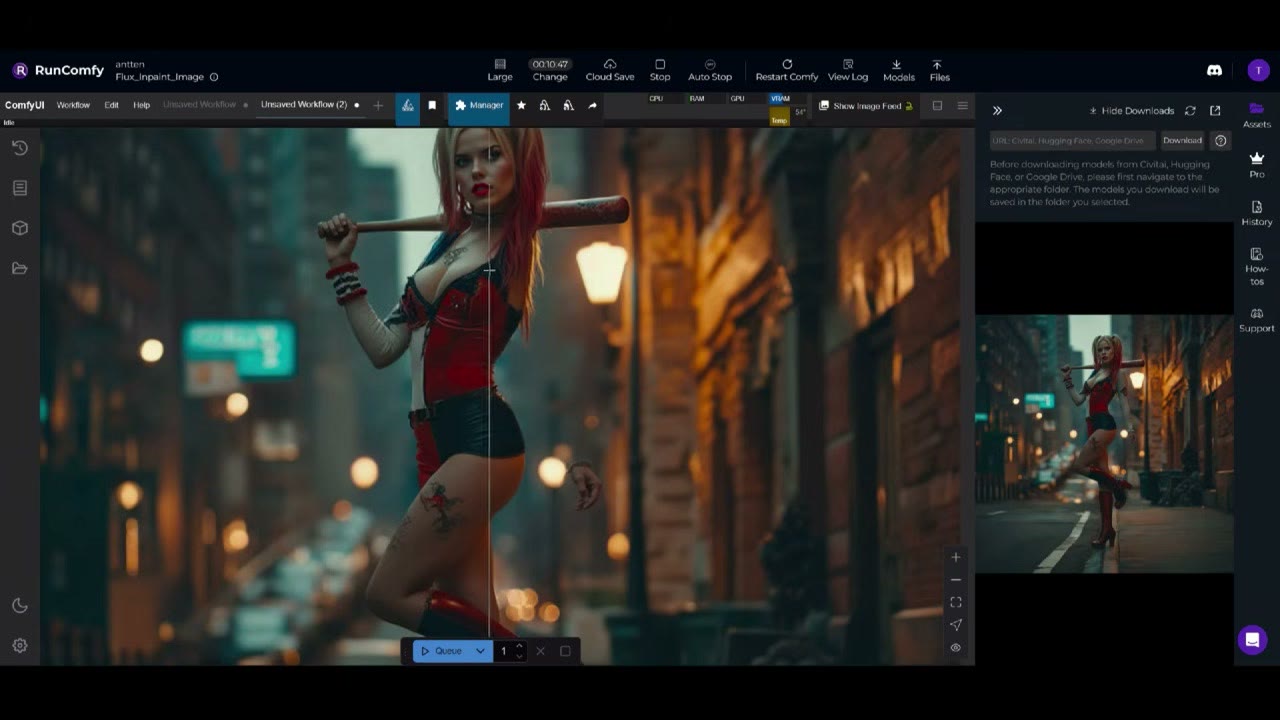
On the sleeves, the first try was good on one side and bad on the other. The mask was a bit too big; a narrower mask along the arm did better, though it still added tattoos I hadn’t asked for. A more specific prompt (“white cotton sleeves”) would probably help. Sometimes you need to repaint the mask because it caught parts you didn’t want.
How the full image came together
- Legs: “smooth legs, high heels, red boots”. The first generation looked great.
- Torso and sleeves together: a big mask, and trouble. The waist merged into the arm, so I split it into separate masks.
- Arms alone: pretty good on the first try. Not the white-silver I wanted, but good enough.
- Face: 10–15 generations.
- Torso and waistline: about 10 more iterations.
- Baseball bat: a really small mask and a few iterations.
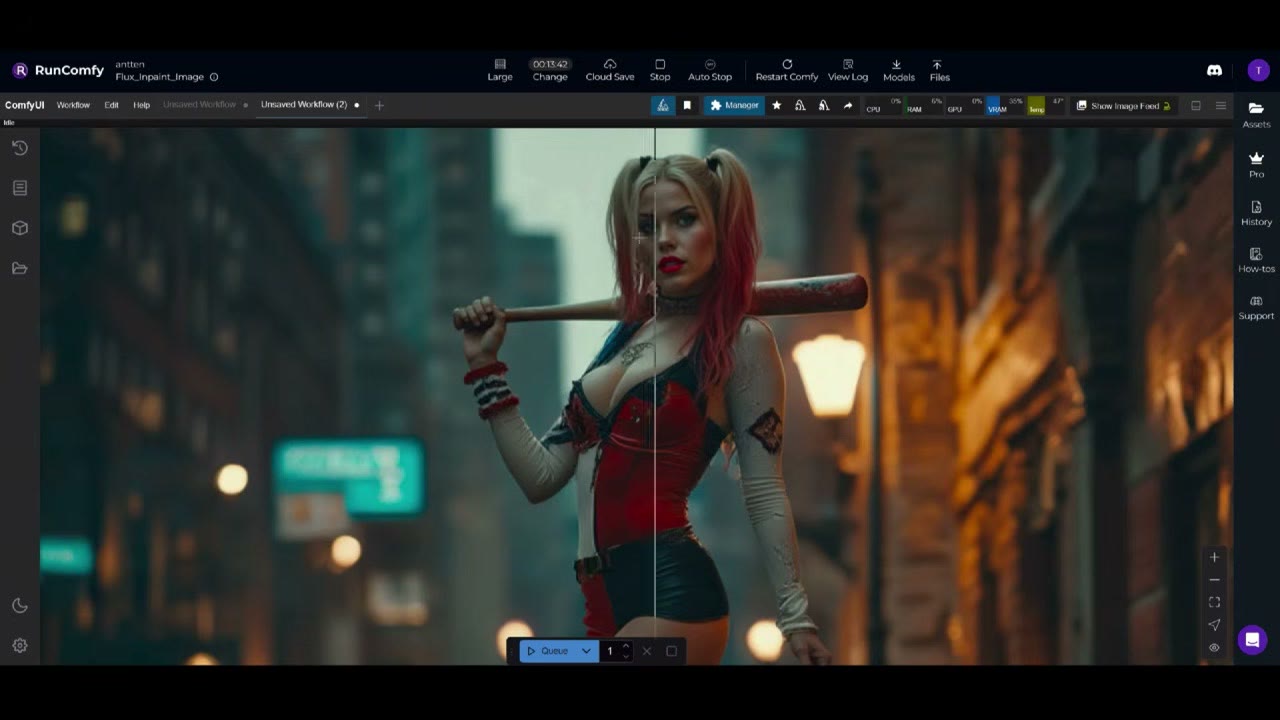
It’s a fair amount of work: download, re-upload, re-run. Redoing a lot of an image can take an hour. If it’s only the face and hands, it’s much quicker.
Where to run it
Flux Dev needs a strong GPU. I recorded this on RunComfy, where the workflow is set up and ready, with about 15 free minutes to try it. Today I run this kind of work on RunPod; see my introduction to RunPod. The workflow is also on my Patreon.
The RunComfy link is a referral link. If you try RunPod, my referral link gives new accounts that sign up with Google $5–$500 in credit after their first $10, and I get a small commission.
Watch the video version (10:15)
Everything above is in the video too, if you'd rather follow along on screen.
FAQ
What denoise should I use for Flux inpainting?
Between 0.60 and 0.70. That gives the model enough freedom to interpret the area without changing it too much or too little; I arrived at it after hundreds of generations.
Why does my inpainting go wrong when I mask a large area?
A big mask covering several parts (arms, torso and legs at once) gives the model too much to change and it messes up the image. Work on one part at a time with a small, soft mask.
Should I write a negative prompt for Flux?
No. Flux doesn’t use negative prompts well. Describe what you want in the positive prompt, and keep it simple; add detail only if it keeps getting something wrong.

Anton Tenitsky is a 3D artist with 15+ years in computer graphics, working with Nickelodeon, Gameloft, Marvel Rivals and many other clients. More about me