You don’t need a 24 GB card or an online service to upscale an image well. Ultimate SD Upscale feeds the GPU one small tile at a time, so a card with 4 GB of VRAM can produce 4K and 8K images locally, for free and without censorship. The quality is really good. Here I build the workflow from scratch, explain the settings that matter, and show where it works and where it fails.
In short
- Nodes: Ultimate SD Upscale and rgthree (for the image comparer).
- Models: an SD 1.5 checkpoint (epiCPhotoGasm) plus an upscale model from OpenModelDB.
- Settings: 4×, 20–30 steps, dpmpp_2m_sde_gpu / karras, denoise 0.25, tiles 512 × 512, CFG 6–8.
- Speed on 4 GB: 512 → 2048 px in 73 seconds; 1600 → 6400 px in about 11 minutes.
- Bigger: chain two nodes for 16×.
New to ComfyUI? See ComfyUI node basics and installing the ComfyUI Manager.
The quick way: load the workflow
The finished workflow is free on my Patreon. You can also drag one of its output images into ComfyUI: the workflow is stored in the image’s metadata. Install any missing nodes from the Manager and restart.
The workflow remembers model names, not the files. If you don’t have the same upscale model or checkpoint in your folders, the field shows “undefined”; pick your own. Upload your image in Load Image and press Queue.
Build it from scratch
1. Install the nodes
In Manager → Custom Nodes Manager, install Ultimate SD Upscale and rgthree’s ComfyUI nodes (it has the compare node I use a lot). Restart.
2. The main node and its inputs
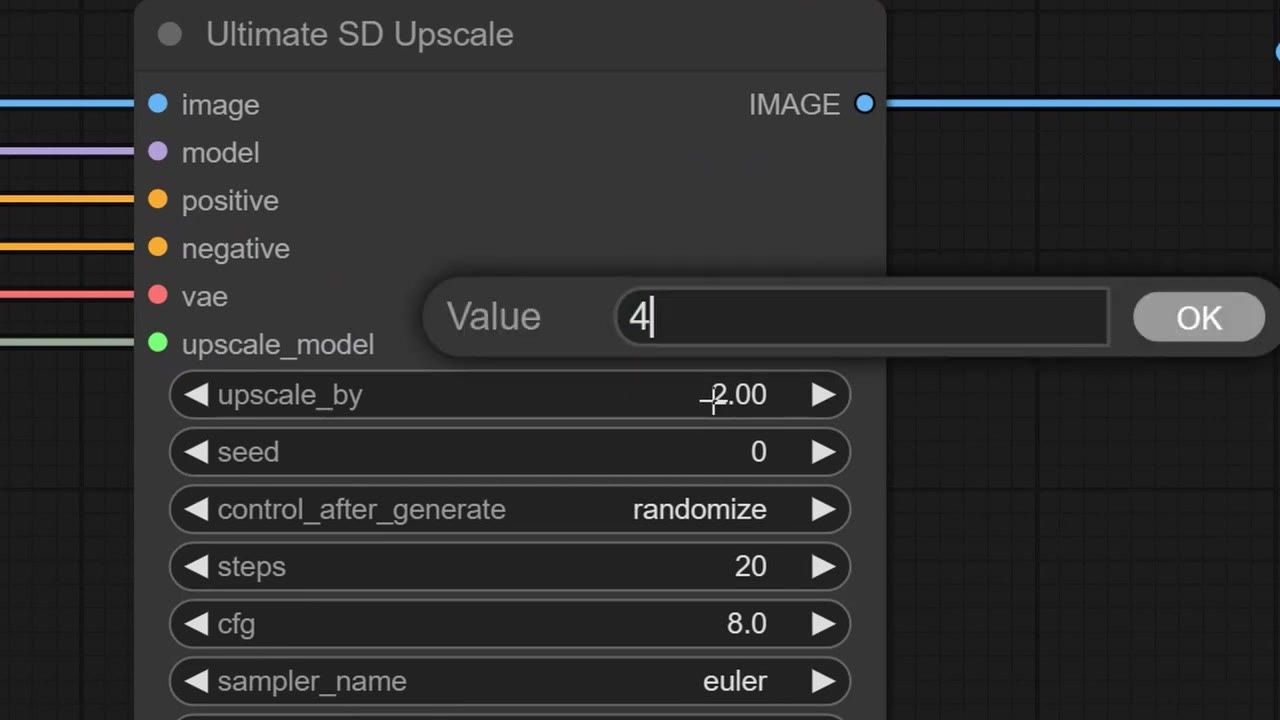
- Add Ultimate SD Upscale. It has a lot of parameters; more on them below.
- Add Load Checkpoint with an SD 1.5 model (I use epiCPhotoGasm) and connect its model and VAE.
- Add two CLIP Text Encode nodes for the positive and negative inputs, and leave them empty. Click the grey dot on each to collapse them, since there’s nothing to see.
- Add Load Upscale Model and connect it.
- Add Load Image with the image to upscale, a Save Image for the output, and an rgthree Image Comparer: the upscaled output into image_a, the original into image_b.
3. Get upscale models from OpenModelDB
OpenModelDB is a great place to find upscale models. Some are better for faces, others for objects, anime or cartoon styles. Each page shows before-and-after samples, similar models, and the licence, so check it if you plan commercial use. The files are small: megabytes, not gigabytes.
The ones I use:
| Model | What it’s good at |
|---|---|
| 4x-UltraSharp | Crisp detail; my default |
| 4x-FaceUpSharpDAT | Faces, sharper |
| 4x-FaceUpDAT | Faces, softer and smoother |
| 4x-Nomos2-hq-drct-l | Architecture; I use it for rocks |
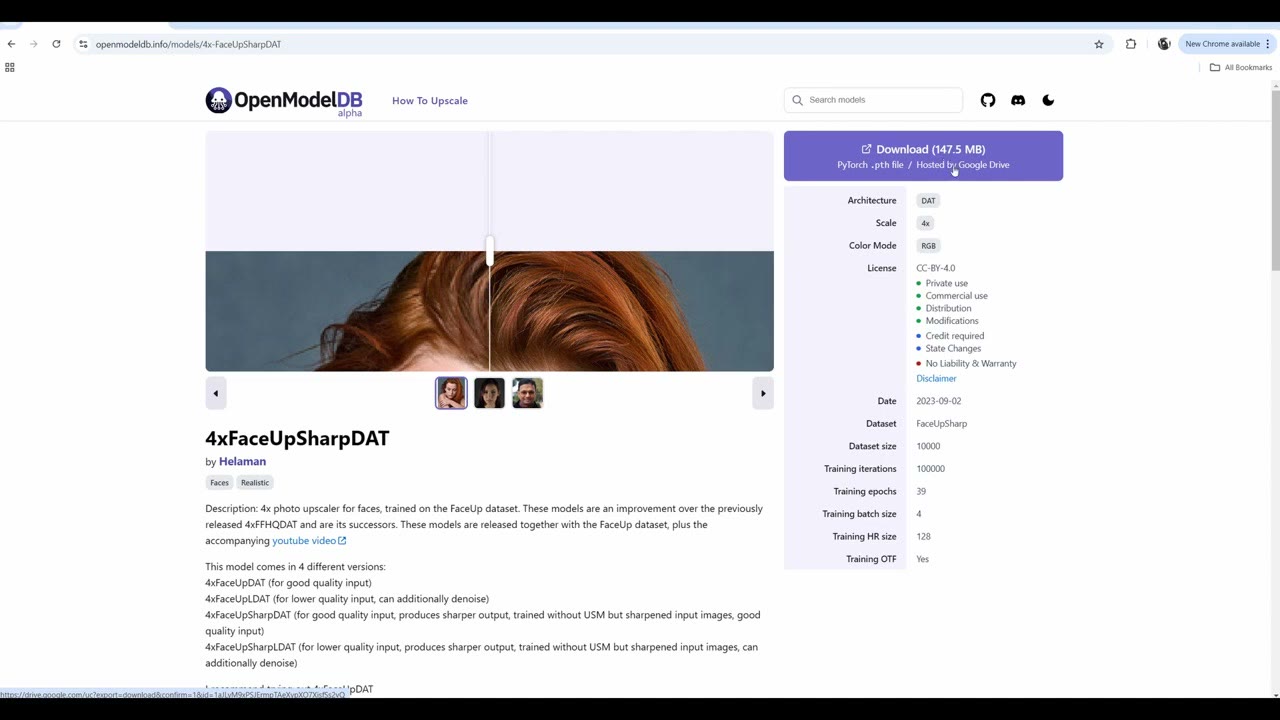
Put the files in ComfyUI/models/upscale_models/, then Edit → Refresh Node Definitions so they appear in the list.
Tidier wires: in Settings (bottom-left) → LiteGraph, change the link render mode from spline to straight or linear.
The settings that matter
- upscale_by: 4. The node goes up to 4× the original. You can chain nodes for 16×, 32× and beyond.
- Steps: 20–30. 40–50 gives slightly better quality but takes a lot longer; there’s a point of diminishing returns.
- Sampler: dpmpp_2m_sde_gpu, which is better for realistic images, with the karras scheduler. These are worth experimenting with.
- Denoise: 0.25. This is very important. At 1.0 it makes a completely new image. At 0.2–0.25 it keeps most of the image and adds a little detail; it feels like 90% stays and 10% changes. I sometimes go to 0.35, which is about the maximum before the image starts to change.
- Tile width and height: 512. SD 1.5 was trained on 512 × 512 images, so it works best on 512 tiles. The node breaks even a huge image into many tiles and processes each separately, which is why it runs on an underpowered card; it just takes longer. Many other upscaling methods simply crash when you run out of VRAM.
- CFG: 6–8. Lower means more variation; very low gives noise. Very high creates artifacts like over-sharpening. 8 is fine.
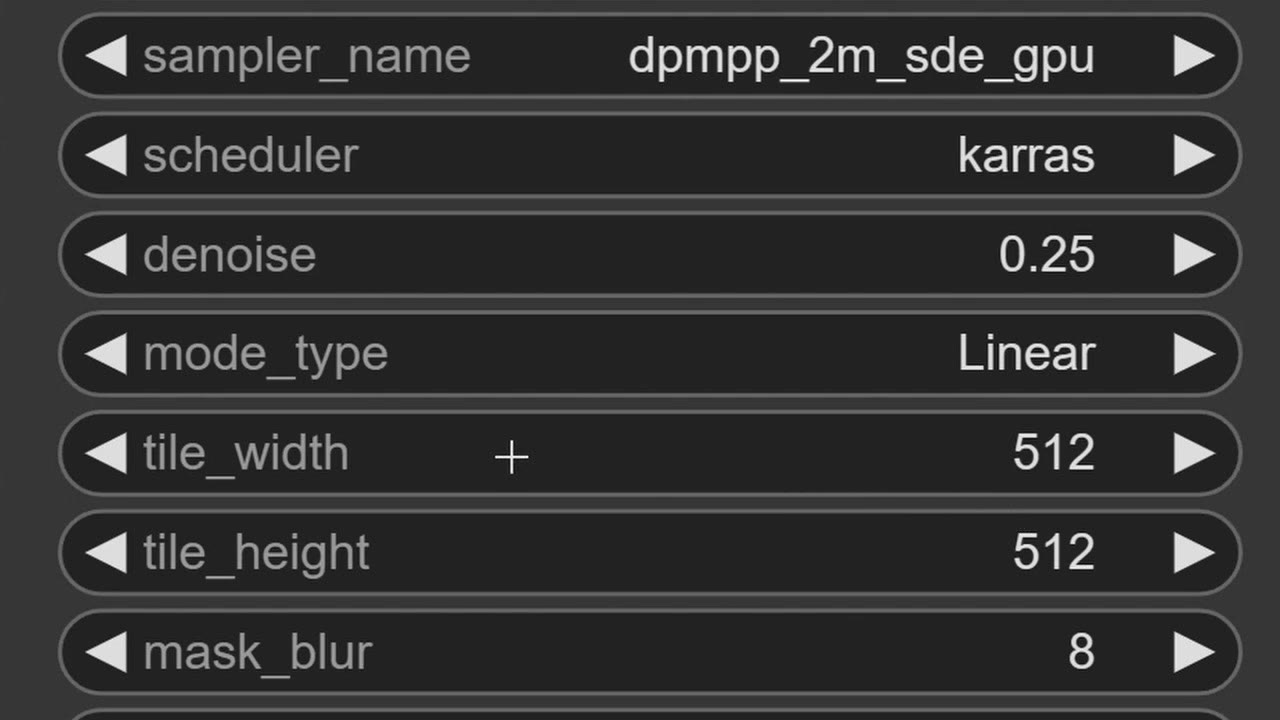
With an SDXL checkpoint the tile would be 1024 × 1024. I tried it: slightly higher quality, but much slower. SD 1.5 at 512 runs much faster with very much the same quality.
Test on a photo you know well
Start with an image you know really well. I used a selfie from Angkor Wat in Cambodia, with patterns in the background and a logo on my shirt, and downscaled it to 512 × 512 on purpose to see how well it would recover.
The command window shows the canvas size, the tile count and the progress. 512 → 2048 at 4× is 16 tiles. At 4K or 8K the count climbs fast: 64, 128, 300, 400 tiles.
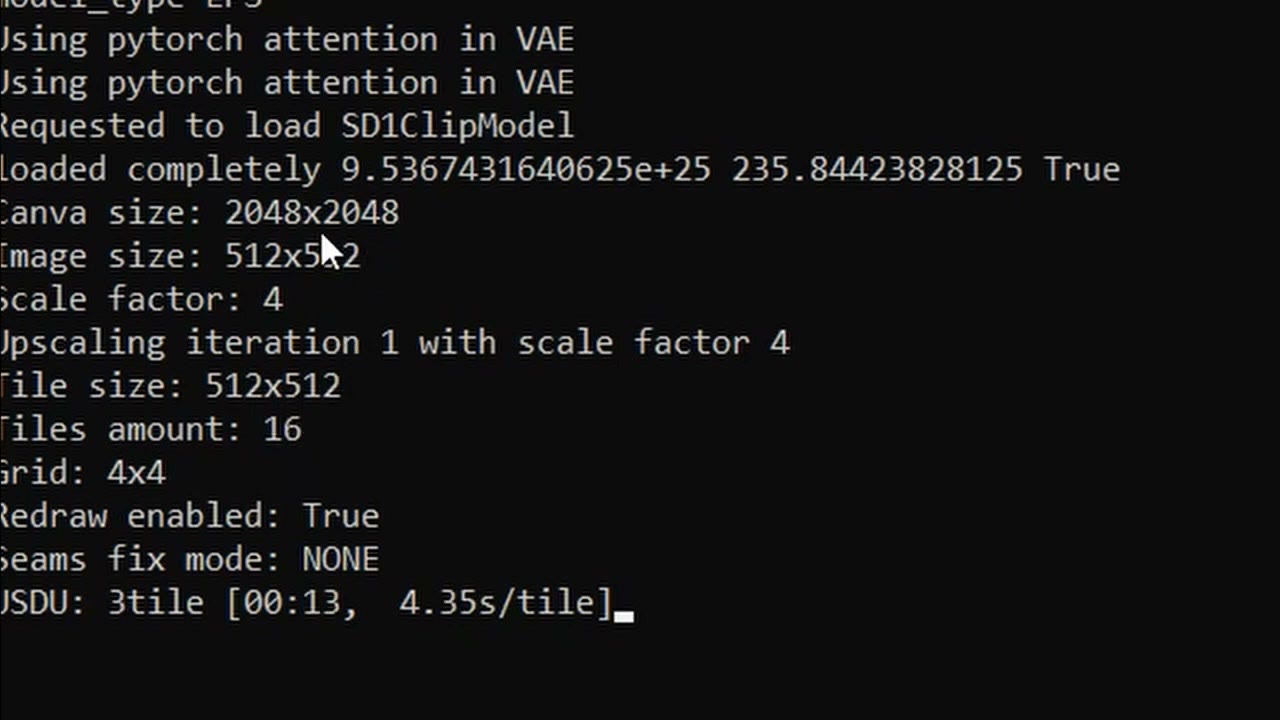
On my 4 GB laptop it took 73 seconds. Dragging the comparer slider: the logo stays sharp and unchanged, the carvings on the temple ceiling are retained, and the glasses look exactly like they do in real life. It did add a pimple to my nose that I don’t remember having.
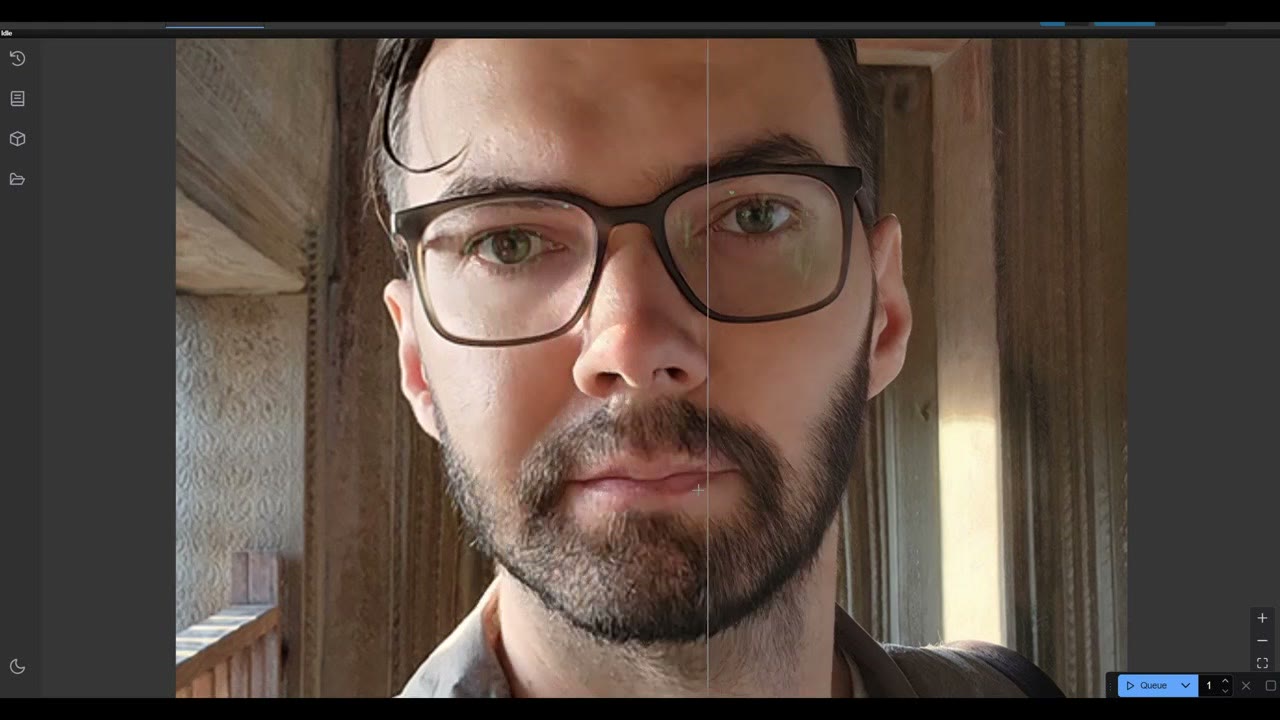
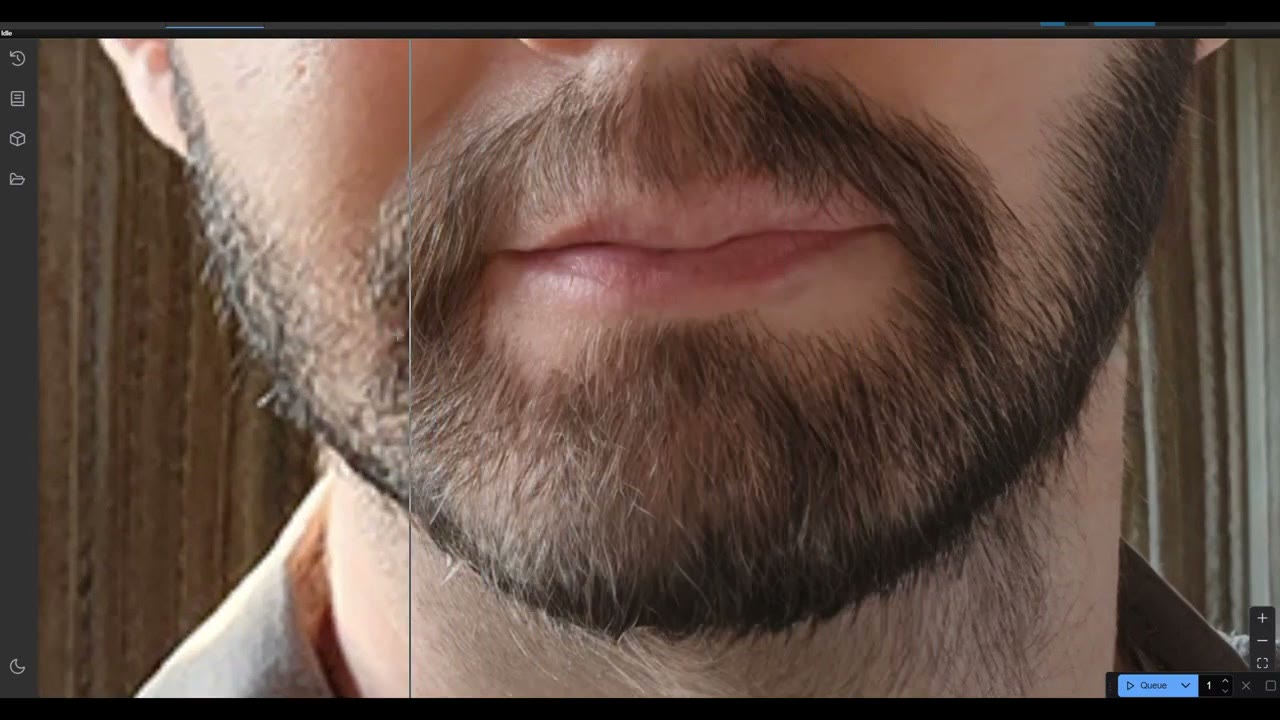
Switching to 4x-FaceUpDAT gave a more flattering, softer look. It denoised the skin more and did a great job on the glasses and the eyes, maybe better than UltraSharp. But my beard became much silkier than it really is, and in extreme close-up the back walls picked up hair-like strokes.
Going bigger, and when it stops helping
For an 8K image, the easiest way is to load the 2K output back into Load Image and run again.
I took a 400 × 300 photo of Donald Trump from Encyclopaedia Britannica. The first pass gave about 1600 px wide. The second pass, 1600 × 1200 → 6400 × 4800, needed 130 tiles at roughly 4–5 seconds each and took 683 seconds. Faster computers can do a second per tile or less. The node shows the current tile, so you can check how long is left and go have a coffee.
The result was a lot smoother, and not necessarily in a good way. In an ultra zoom it looked better, but at a mid shot I don’t think it improved much; the skin lost quality to the extra denoising. For a second pass it can make sense to change models, for example UltraSharp to stop the face over-smoothing.
Comparing the original and the final
The comparer only updates when the graph runs, so to compare the tiny original and the 6K result without re-upscaling: select the upscale nodes and press Ctrl+B to bypass them, add two Load Image nodes (the final image and the original), connect them to the comparer, and queue. It runs in a few seconds.
16×: chain two upscale nodes
- Select the Ultimate SD Upscale node, Ctrl+C, then Ctrl+Shift+V to paste it with all its connections.
- Connect the first node’s image output to the second node’s image input.
- Connect the second node’s output to Save Image and to the comparer’s image_a (the original stays on image_b).
- Both nodes share the checkpoint, the empty prompts and the upscale model. For different upscale models per pass, copy the Load Upscale Model node too.
You can type into the prompts and it does affect the result, but it didn’t work well for me, so I leave them empty.
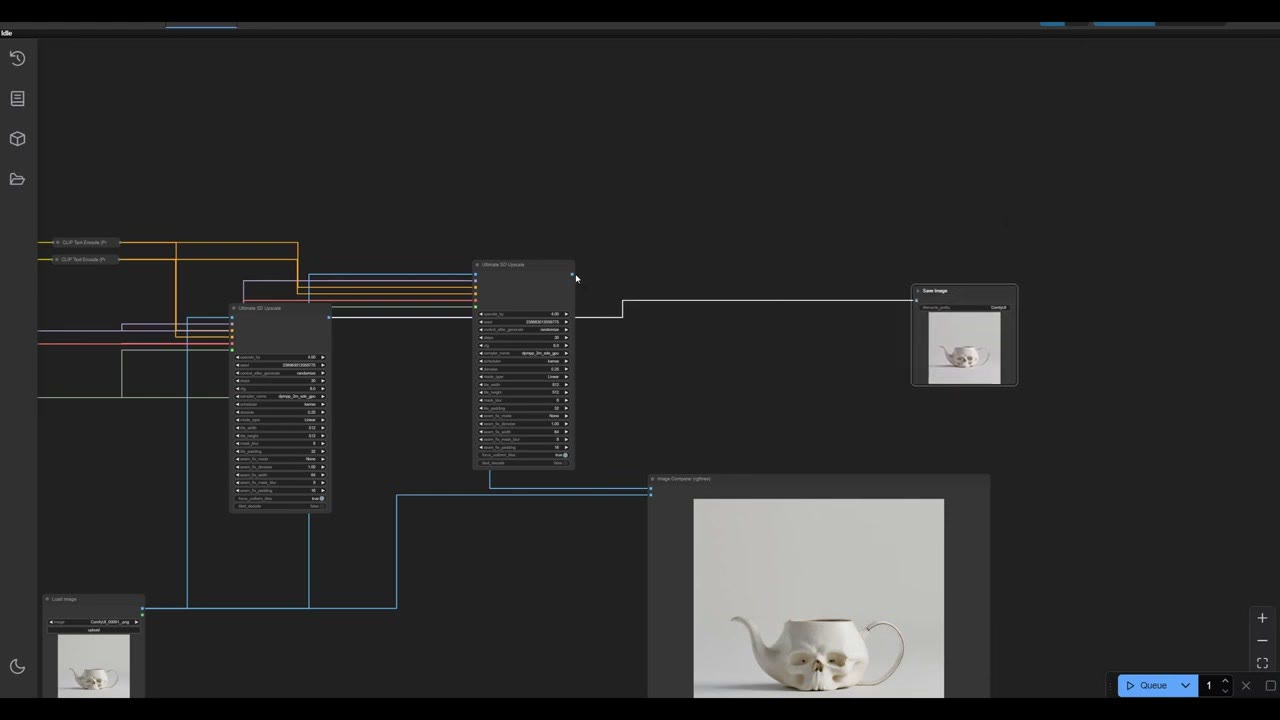
On the laptop this can take 30 minutes. It’s not a trivial task for a low-VRAM computer; many upscalers I studied couldn’t do it at all, and others add too much noise.
Results: where it shines and where it fails
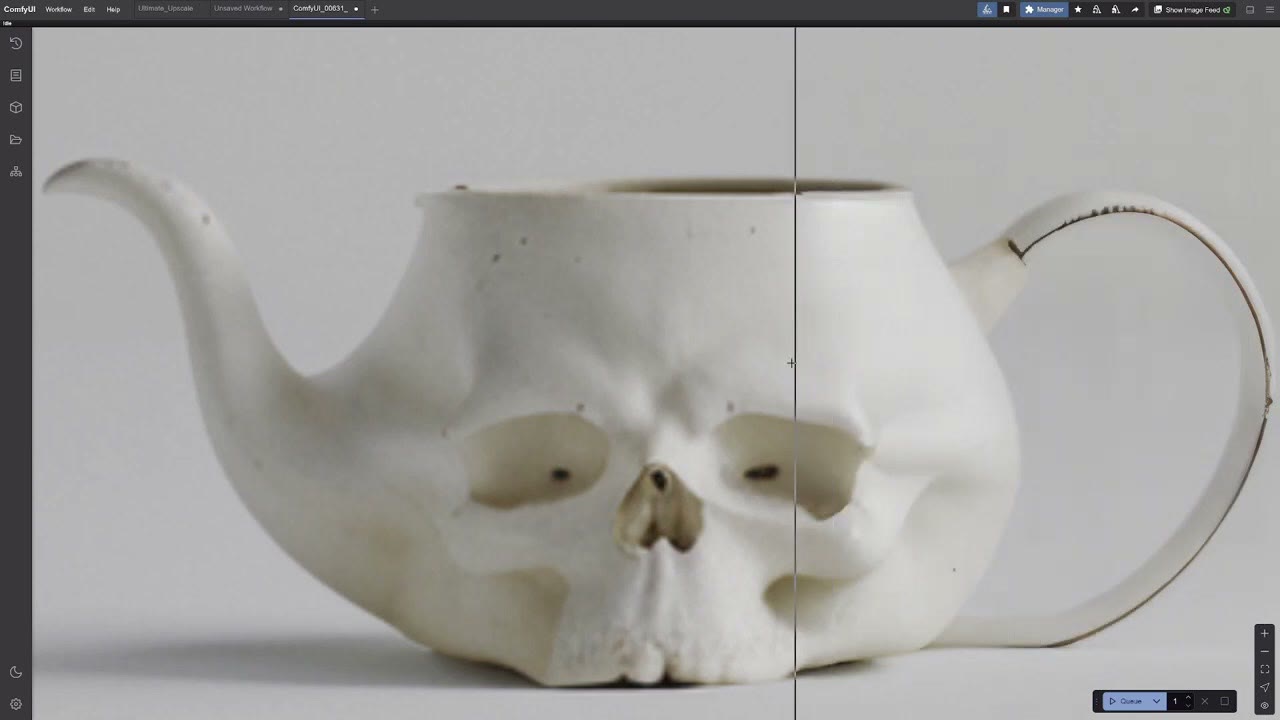
My skull teapot, from the image-to-image merging guide, went from 512 px to 8K with UltraSharp, with super high detail even in an ultra zoom. I’d print it and put it on the wall.
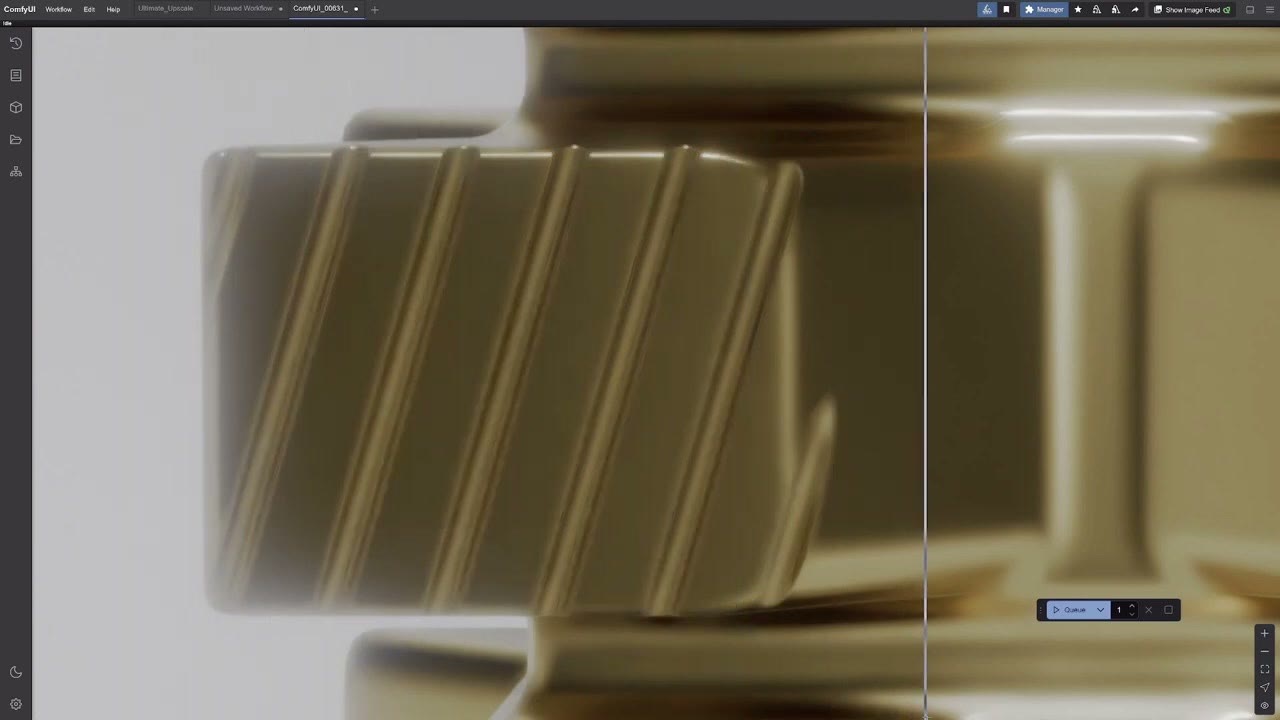
I originally got into AI upscaling for my own work. On a perfume bottle I designed in 3D-Coat, voxel cuts leave rough edges; going from 1500 to about 3000 px smoothed them out beautifully.
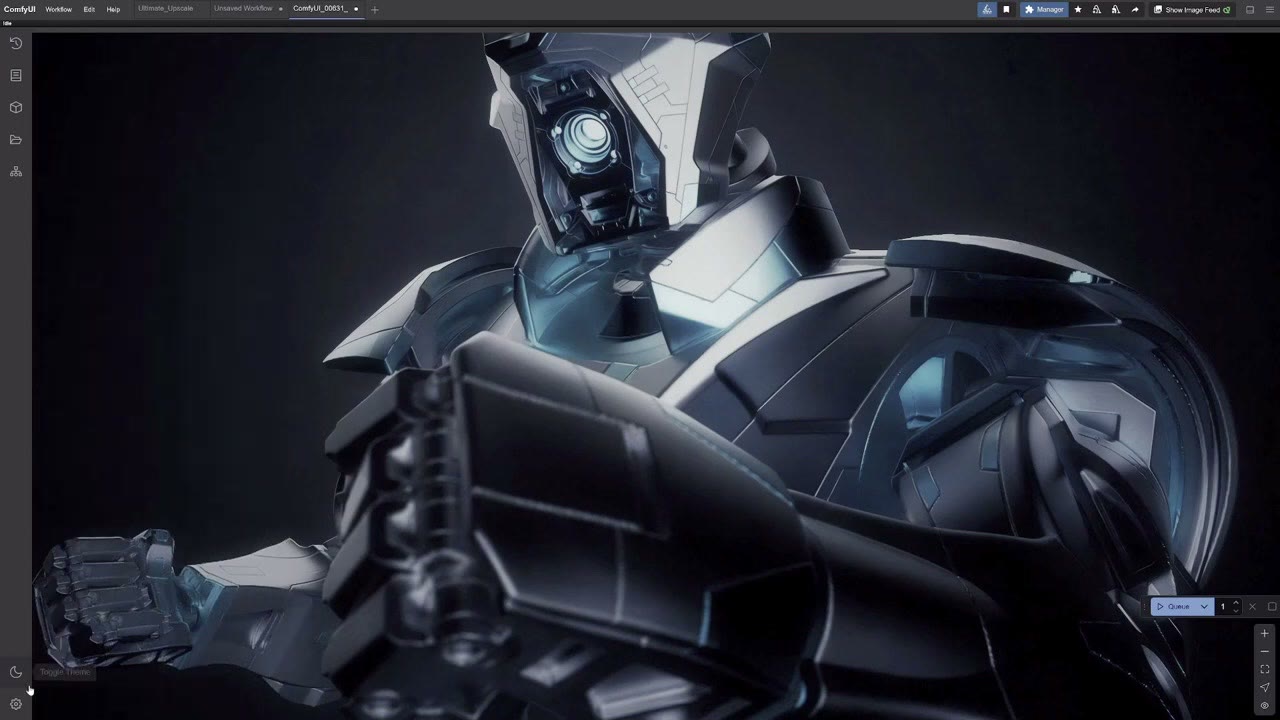
On a robot design, UltraSharp sharpened the jagged polygon edges from 3D-Coat instead. 4x-FaceUpDAT gave much smoother lines, the ones I wanted. Some tiny details on the face got squished and changed, a minor cost for a great, quick upscale of a final render.
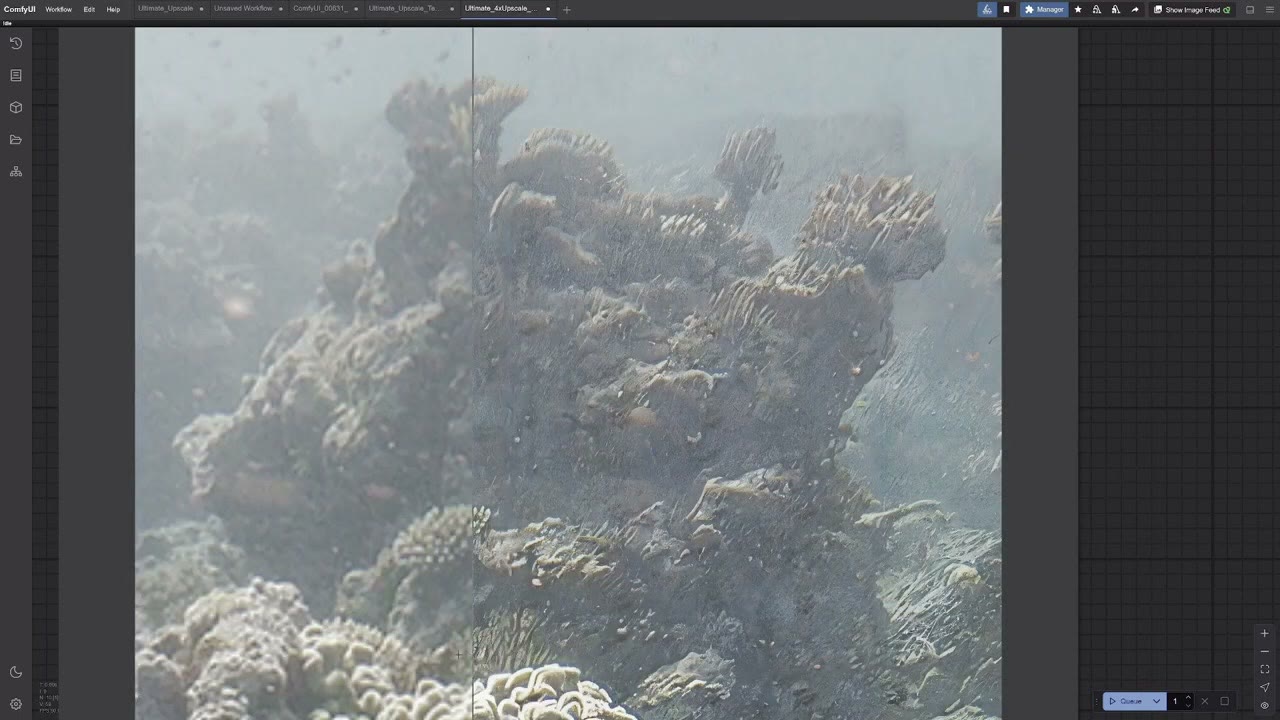
Where it failed: a GoPro photo of underwater corals, 2500 px wide, taken to 10–12K. The model clearly hadn’t been trained much on corals. Cropping a 300 px piece to give it more room to invent detail didn’t help either. For underwater images I’d need a completely different upscale model.
On an old rock render whose scene file I’d lost, the intermediate 2000–3000 px result was really nice. At 8–10K it got too smooth and over-denoised; still far better than the tiny original, but not a look I liked.
If you know other upscaling techniques that work better, leave a comment on the video. This is just my workflow.
Watch the video version (22:11)
Everything above is in the video too, if you'd rather follow along on screen.
FAQ
Can I upscale images with only 4 GB of VRAM?
Yes. Ultimate SD Upscale splits the image into 512 × 512 tiles and processes them one at a time. On a 4 GB laptop, a 512 px image went to 2048 px in 73 seconds; a 6400 × 4800 output took 130 tiles at about 4–5 seconds each.
What denoise should I use for upscaling?
0.25 keeps most of the image and adds a little detail. 0.35 is about the maximum before the image starts to change. At 1.0 you get a completely new image.
Which upscale model is best?
It depends on the image. 4x-UltraSharp keeps details crisp; 4x-FaceUpDAT is softer and smoother, good for faces and for hiding jagged edges; Nomos2 suits architecture and rocks. None of them did well on an underwater coral photo.
How do I upscale more than 4×?
Run the output through the node again, or chain two Ultimate SD Upscale nodes for 16×. Expect very long render times, and watch for over-smoothing at 8K and above.

Anton Tenitsky is a 3D artist with 15+ years in computer graphics, working with Nickelodeon, Gameloft, Marvel Rivals and many other clients. More about me