Scale the box, get a bigger gun. This setup lets you design a prop directly in Blender, from cubes and cylinders, while ComfyUI turns the viewport into finished concept art live: move a part, and the render updates. It works with SDXL or Flux. Flux is slower, but its output is sharper and higher quality.
It’s open source, with no subscriptions and no censorship. Here I build the whole workflow from scratch.
In short
- Capture: the Screen Share node from Mixlab captures the Blender window.
- Model: Juggernaut XL Lightning, a fast SDXL model: 6 steps, CFG 1.5.
- Depth: Depth Anything plus an SDXL depth ControlNet, strength about 0.55.
- Speed: about 25 seconds per update on a 4 GB laptop, 15 on 24 GB.
- Tips: add a ground plane, avoid extreme angles, and give one subject all the pixels.
Build the workflow
1. Start from the default template
Open ComfyUI, go to Workflow → Browse Templates and pick the basic image generation template. Ignore the warning about a missing model if you already have it.
2. Use a fast model
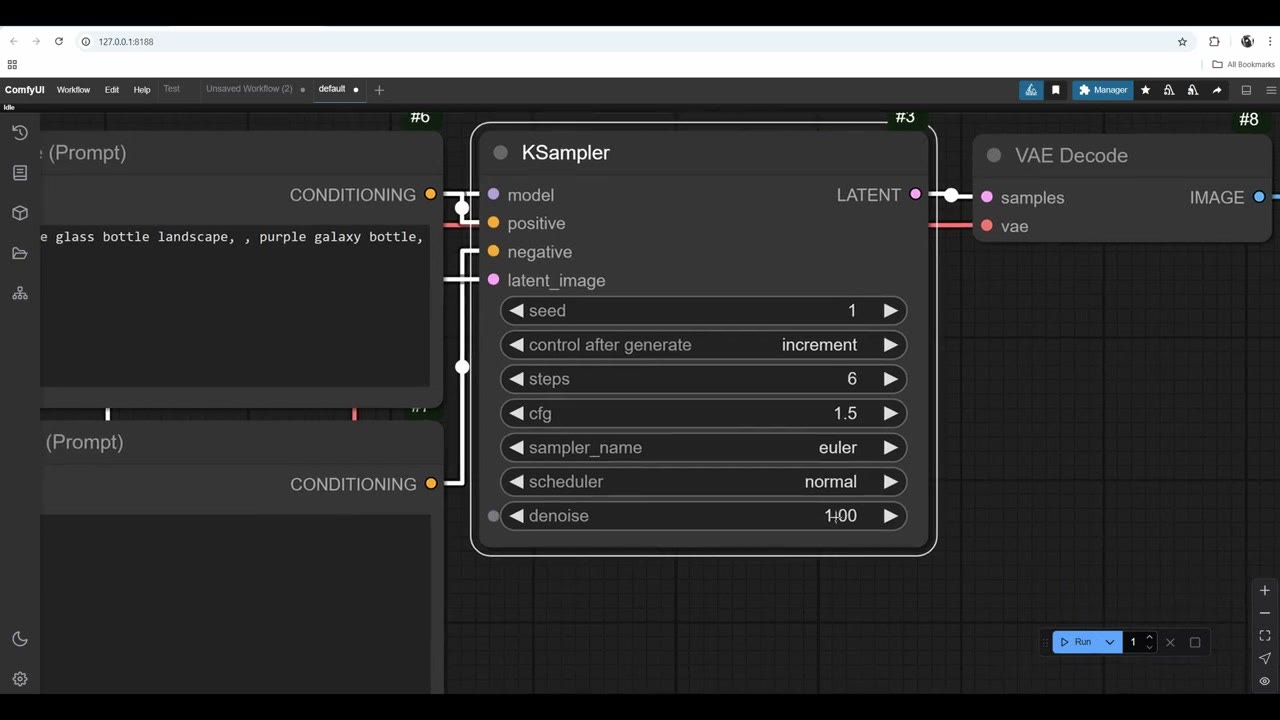
For live work, speed matters. I use Juggernaut XL Lightning, a very fast SDXL model that needs only 4–6 steps at CFG 1–2. Set the KSampler to:
- Seed: increment, so renders are numbered 1, 2, 3 instead of huge random numbers.
- Steps: 6.
- CFG: 1.5.
- Sampler / scheduler: euler / normal.
- Denoise: 1.0. Denoise mixes the original image into the result. Lower it here and your grey Blender capture just turns into a greyer render.
3. Add screen capture
Search for Screen Share from the Mixlab nodes (install the pack from the Custom Nodes Manager). The Manager may warn about conflicts with other packs, because many node names overlap; that’s usually not a problem unless your workflow is huge.
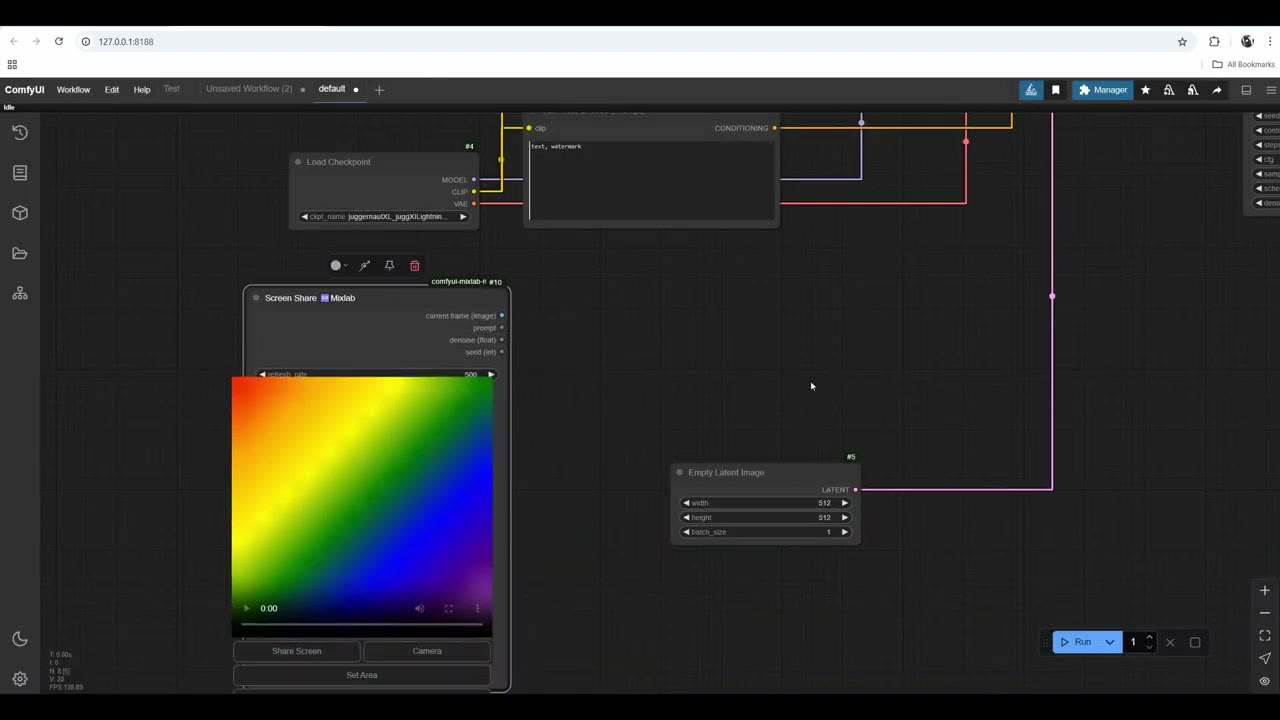
It’s a JavaScript node and a little buggy: its interface draws outside the node’s boundaries, and if you switch between workflows it can freeze into rainbow colours. Reloading the browser (Ctrl+R) fixes it; that reloads the page, not ComfyUI.
4. Resize and encode
- Image Resize (from Essentials) takes the captured image to 1920 × 1088. I use those numbers with Flux too, and they work well with SDXL. This time I wanted wide images, not only squares.
- VAE Encode turns the pixels into latent space. Connect the VAE from the checkpoint, and send the latent to the KSampler. Delete the Empty Latent Image node.
5. Depth and ControlNet
- Depth Anything: get the model from the Model Manager (the biggest should give the best quality), reload the browser, and set its resolution to the short side, 1088. That still works when you flip to portrait.
- A preview node, to see the depth map.
- Apply ControlNet, the node that rules all the inputs: the depth image, the VAE, and both prompts pass through it to the KSampler.
- Load ControlNet Model with an SDXL depth ControlNet (also in the Model Manager).
Save the workflow at this point. Rename the prompt nodes “Positive Prompt” and “Negative Prompt” to keep things readable.
Go live
Put Blender and the browser side by side, on two screens or split one screen (Win+Left / Win+Right). In Blender, isolate the prop and press N to hide panels you don’t need.
Write the prompt (I had ChatGPT help), then click Share Screen, pick the Blender window and set the area: drag a frame around the part of the viewport to capture. The captured image is small, and that’s fine: the model only needs an approximation of the shape.
Click Live Run. Every change in Blender now triggers a new render.
First fix: ControlNet strength
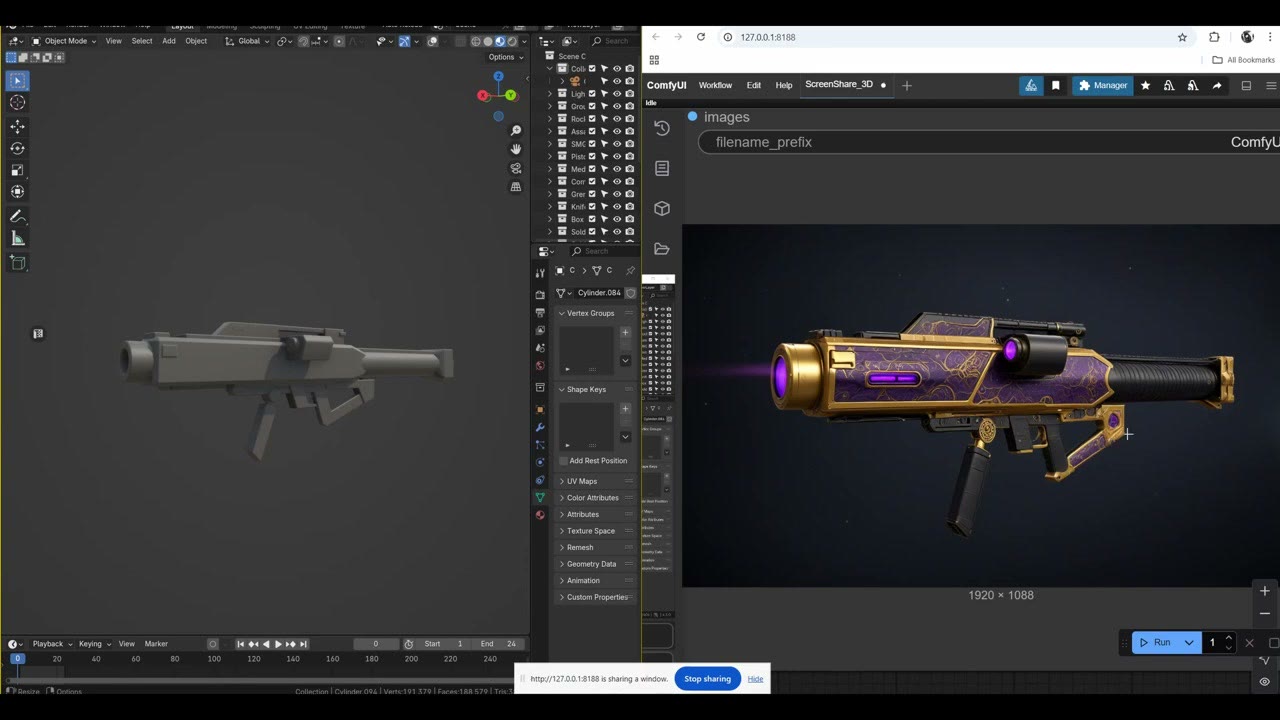
The first result looked stretched: the capture area’s proportions didn’t match the 1920 × 1088 canvas. Adjust the area until it’s roughly the right shape.
The bigger fix: ControlNet strength was 1.0, so the model followed the depth map too rigidly. At 0.55 it looked much better. At low strength it gets creative and can add random handles and parts, which is sometimes a bonus.
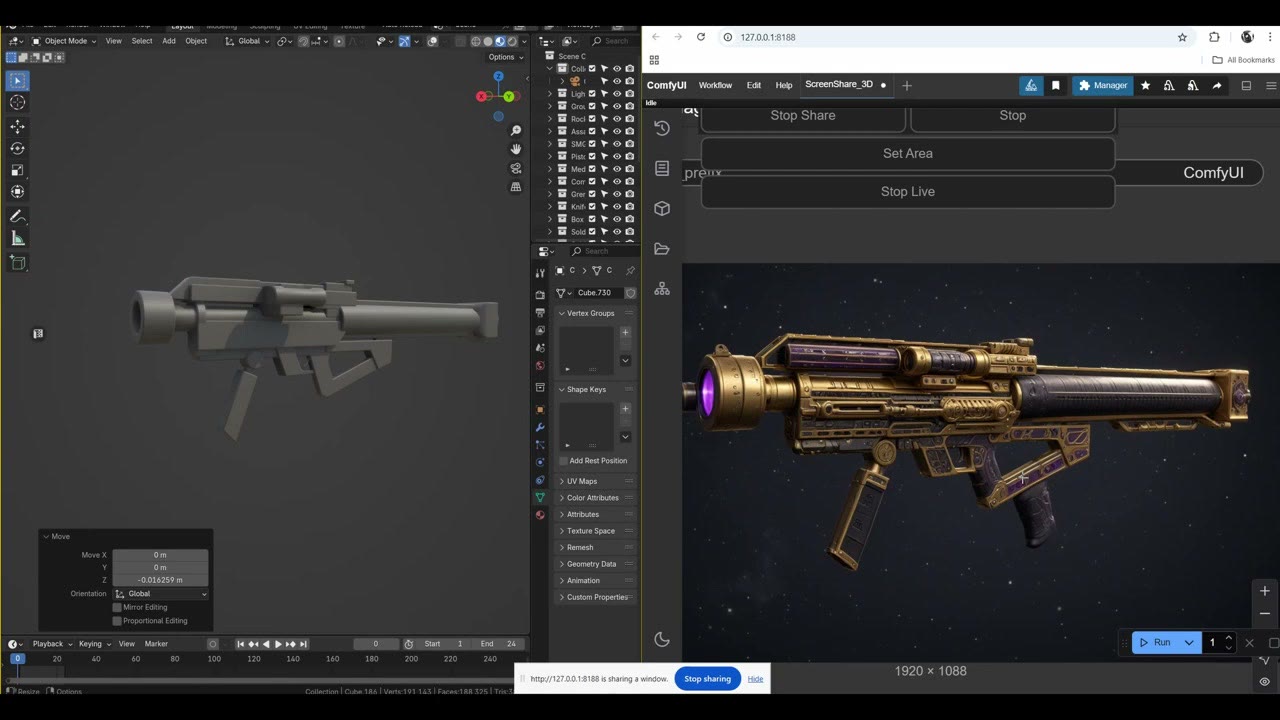
Speed: on my 4 GB laptop, about 25 seconds per update after 40 seconds of initial loading. On 24 GB it was about 15 seconds. Wide images are bigger than squares, so they take longer. There’s some lag while you edit, since it’s still rendering your previous position.
Design by moving boxes
The fun part is redesigning in real time. My launcher is built from separate pieces, so I can delete parts, shorten the body or move elements to make a different weapon, and the render follows. The complexity it gets from the shapes is quite amazing.
Two things to watch:
- Extreme angles confuse it. Strong perspective makes it add random elements, so I avoid them.
- Check the framing. Rotate the view and make sure the prop isn’t being clipped by the capture area.
Tanks and soldiers
I swapped to a tank blockout and a new prompt, and got a pretty nice-looking tank. It was not as cyberpunk as I’d asked for, though: SDXL tends to make things realistic and lacks Flux’s creativity.
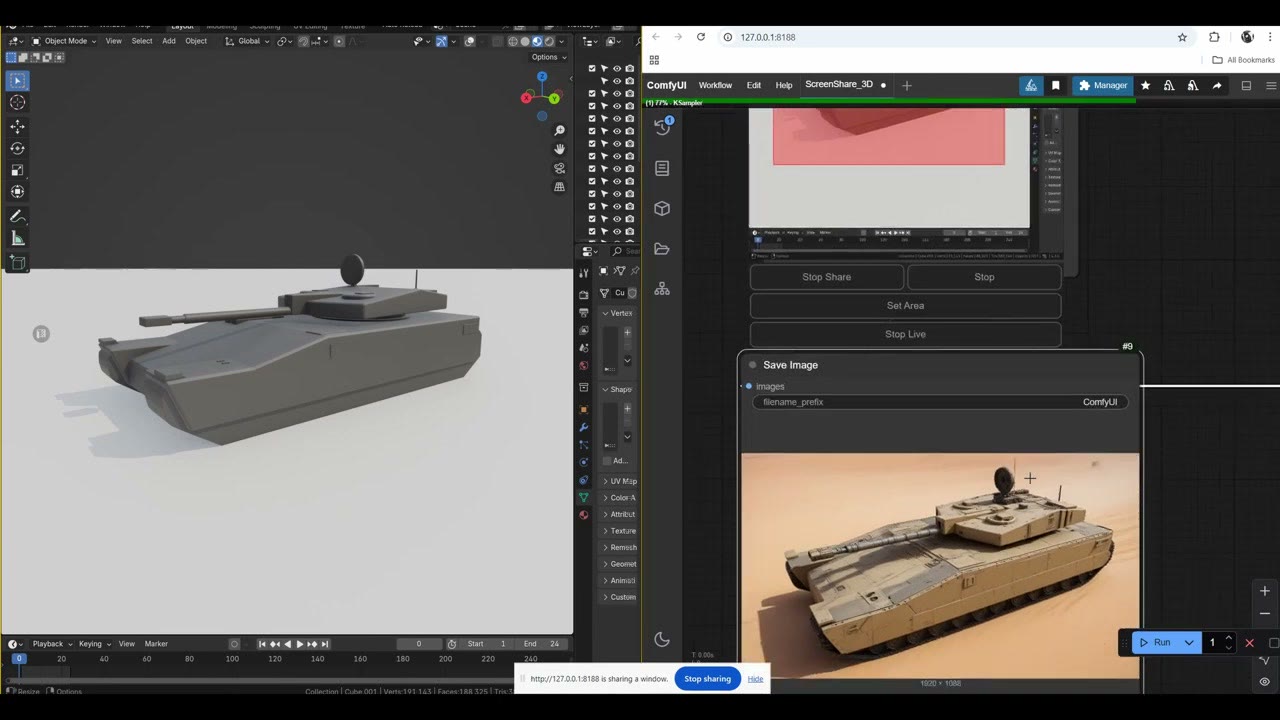
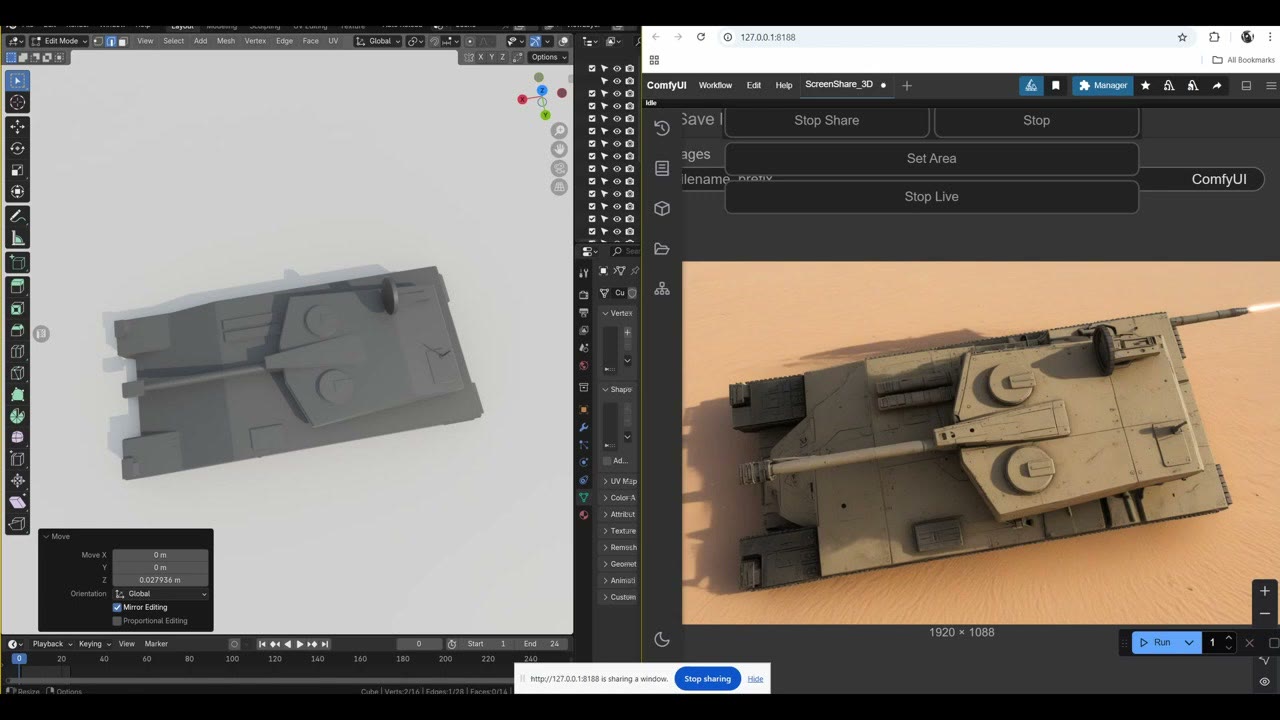
Add a ground plane. It helps the depth model find the ground; without one, the object can end up floating in fog. With it, the render read the horizon really well. Changing the tank’s proportions is just a bevel modifier away. A top-down camera gave more sci-fi results, though not great concept art: it put a gun on the back, or maybe an exhaust pipe.
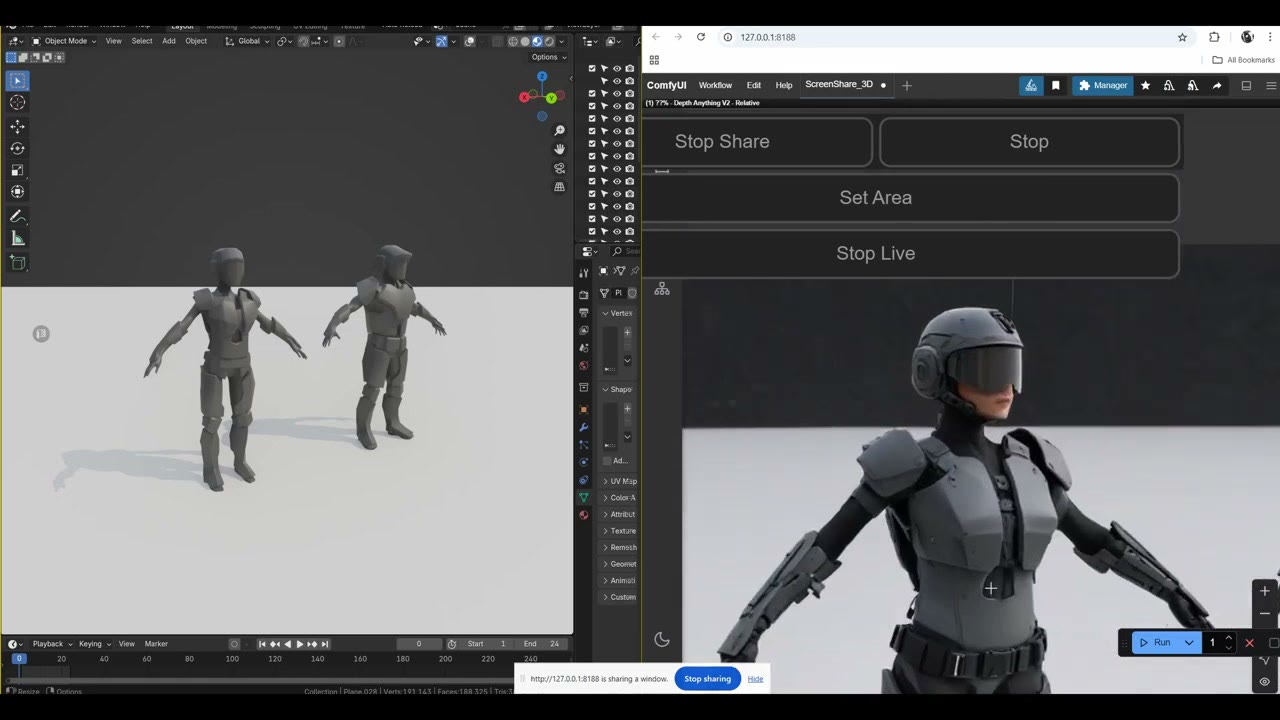
With two blocked-out soldiers and a new prompt, it read the shapes really well: the double-breasted plate on the female soldier, the visor, metal armour on the forearms where I’d modelled it, the belt, and even reasonable fingers for SDXL. It tends to make both figures the same gender; SDXL can be tricky like that.
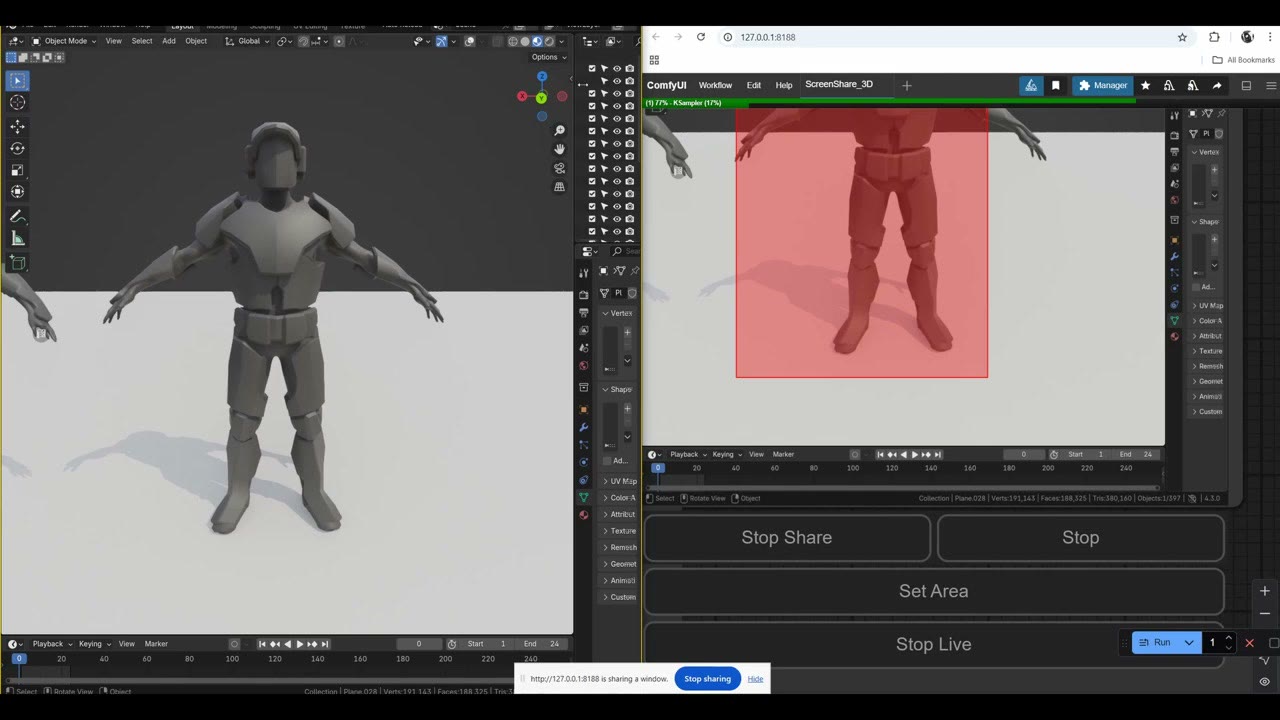
Give one subject all the pixels. For a single soldier, switch to portrait: swap the resize to 1088 × 1920, reset the capture area, and hide Blender’s side panel. With all the pixels on one figure, the quality went up significantly.
When you’re happy, stop the live run and stop sharing. This is a quick, low-cost way to explore designs. For higher-quality versions of the same ideas, see the automated 3D-to-concept-art pipeline with Flux and its earlier SDXL counterpart, real-time concept art with Blender and Stable Diffusion. All the workflows and Blender scenes are on my Patreon.
Watch the video version (14:59)
Everything above is in the video too, if you'd rather follow along on screen.
FAQ
How fast is live rendering with SDXL Lightning?
On my 4 GB laptop, about 25 seconds per update for a wide 1920 × 1088 image, after about 40 seconds of first-time loading. On 24 GB it was about 15 seconds.
What ControlNet strength works for live Blender capture?
About 0.55. At 1.0 it follows the blockout too rigidly; lower values let the model invent detail, sometimes randomly.
Why does the AI go wrong at some camera angles?
Extreme perspective confuses it and it starts adding random elements. Keep to moderate angles, and add a ground plane so the depth model can find the floor.

Anton Tenitsky is a 3D artist with 15+ years in computer graphics, working with Nickelodeon, Gameloft, Marvel Rivals and many other clients. More about me