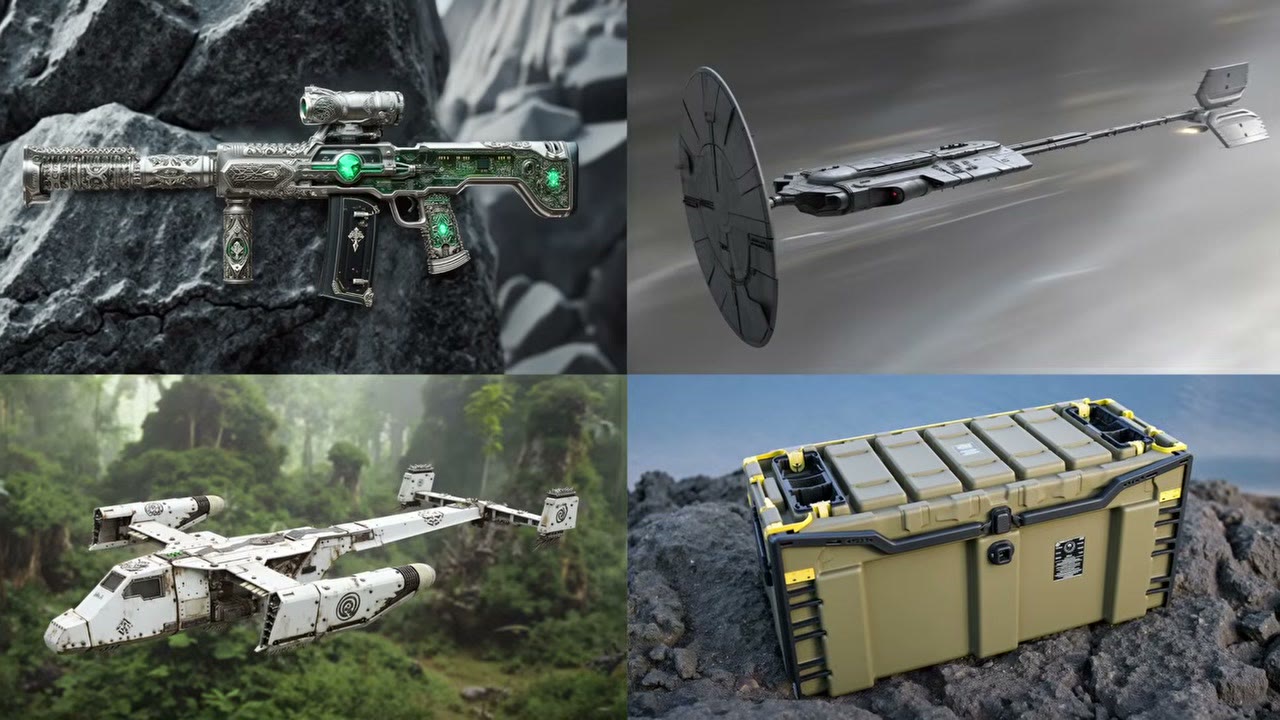
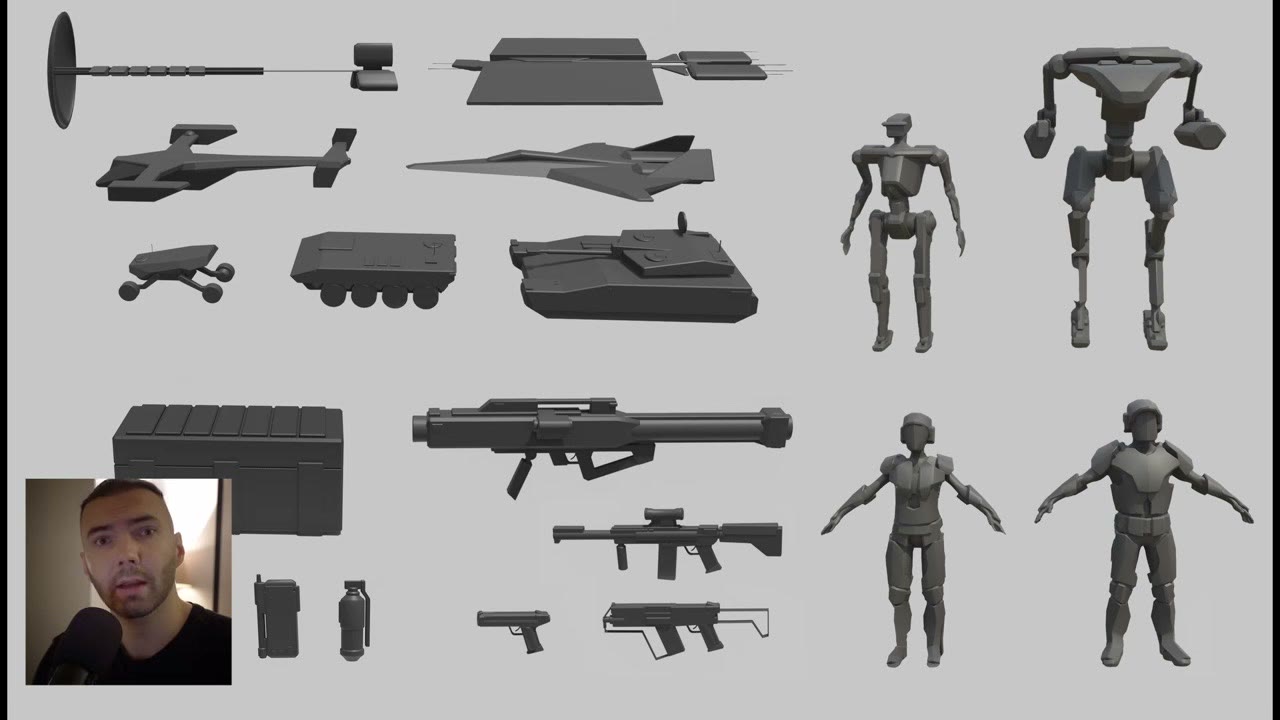
This is the pipeline I use to turn simple 3D blockouts from Blender into concept art: dozens of props and characters, each with its own description, in many styles, overnight. It’s also the middle step of a bigger pipeline, from blockout to concept art to 3D model.
It’s a lot of nodes, so I built it up in stages, from a simple depth workflow to the full automated version. Each stage is useful on its own, and that’s the best way to understand the whole thing.
In short
- GPU: 12 GB of VRAM minimum for Flux, or use a GGUF version or a cloud GPU.
- Depth: Depth Anything makes the depth map; Flux depth ControlNet at about 0.7.
- Flux: guidance 3–3.5, 25 steps, negative prompt empty.
- Automation: prompt lists (Inspire Pack), prompt stacking, and loop counters that match each screenshot to its own prompt.
- Sorting: an aspect-ratio check switches the canvas between landscape and portrait automatically.
You can try the finished workflow without installing anything on RunComfy, already set up, with about 15 free minutes: enough for an image or two. All the workflows, prompt lists and 3D models are on my Patreon, but nothing is hidden: everything is explained below.
Stage 1: Image to depth to image
The simplest workflow. Load a screenshot, resize it if it doesn’t match your target size, and run it through Depth Anything. I set its resolution to 1088, which applies to the short side of the image, so a portrait screenshot needs no change there.
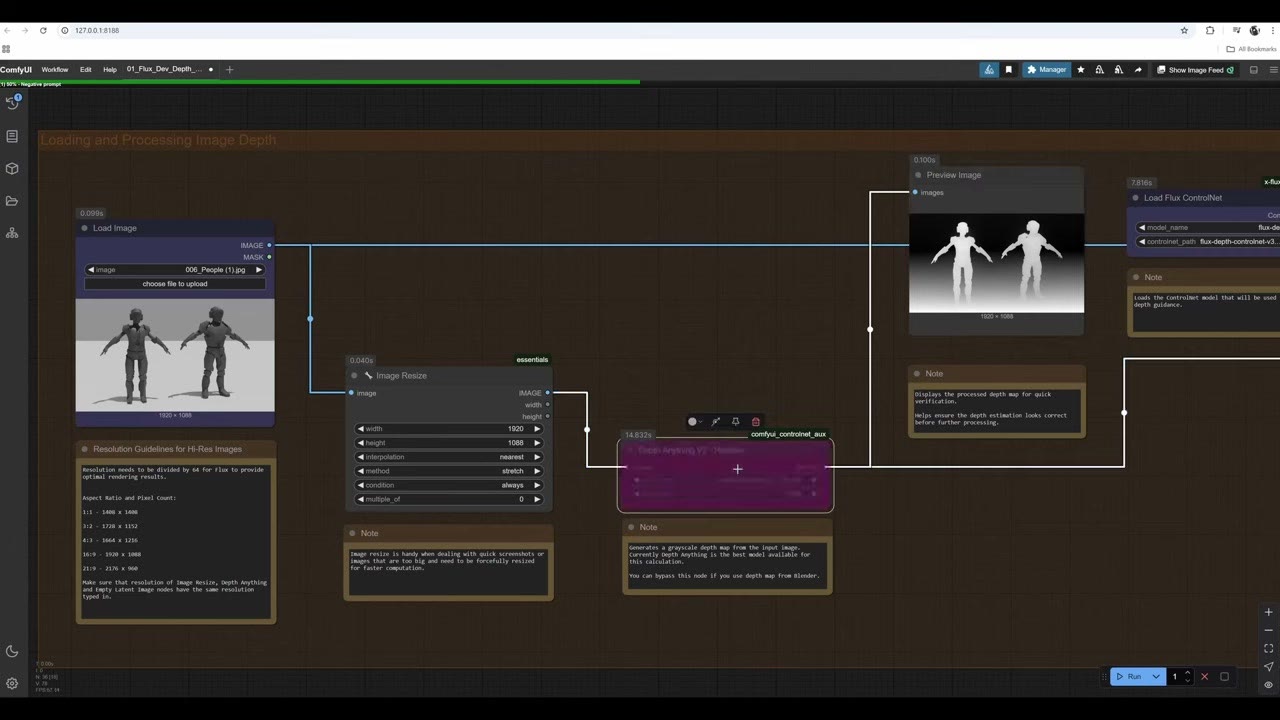
You can render a depth map in Blender instead and bypass the Depth Anything node (Ctrl+B). I don’t bother: Depth Anything is good enough, precision isn’t critical here, and it saves time.
ControlNet. The depth map goes to Apply Flux ControlNet with a Flux depth ControlNet loaded. Strength is the key setting. I keep it at 0.7; anywhere from 0.6 to 0.8 works. Lower makes the result blurry and too loose; at 1.0 the image glitches out. With SDXL I go down to about 0.5.
Sampler. It goes to the XLabs Sampler, not the standard KSampler, which has no input for the ControlNet conditioning.
Model. I use the full Flux dev model. On low VRAM, use a GGUF version: the same setup with a Unet Loader (GGUF) and a Q4 GGUF Flux model. The quality doesn’t suffer much, and it runs faster.
Prompt. The DualCLIPLoader with Flux’s two text encoders, then the prompt. Flux Guidance at 3 to 3.5: higher pushes the prompt harder and starts to burn the image. Flux doesn’t subtract a negative prompt the way SDXL does, so I usually leave it empty.
Sampler settings. Seed on increment (images get numbered 2265, 2266 and so on, which makes it easy to track what ran overnight), 25 steps. More steps is diminishing returns, and past 50 you just waste time.
Write better prompts with a chatbot
My first test prompt was just “sci-fi soldier”, and the result was ugly. Two quick fixes made it much better:
- Put “cartoony, stylized illustration” in the negative prompt. It has a small effect in Flux.
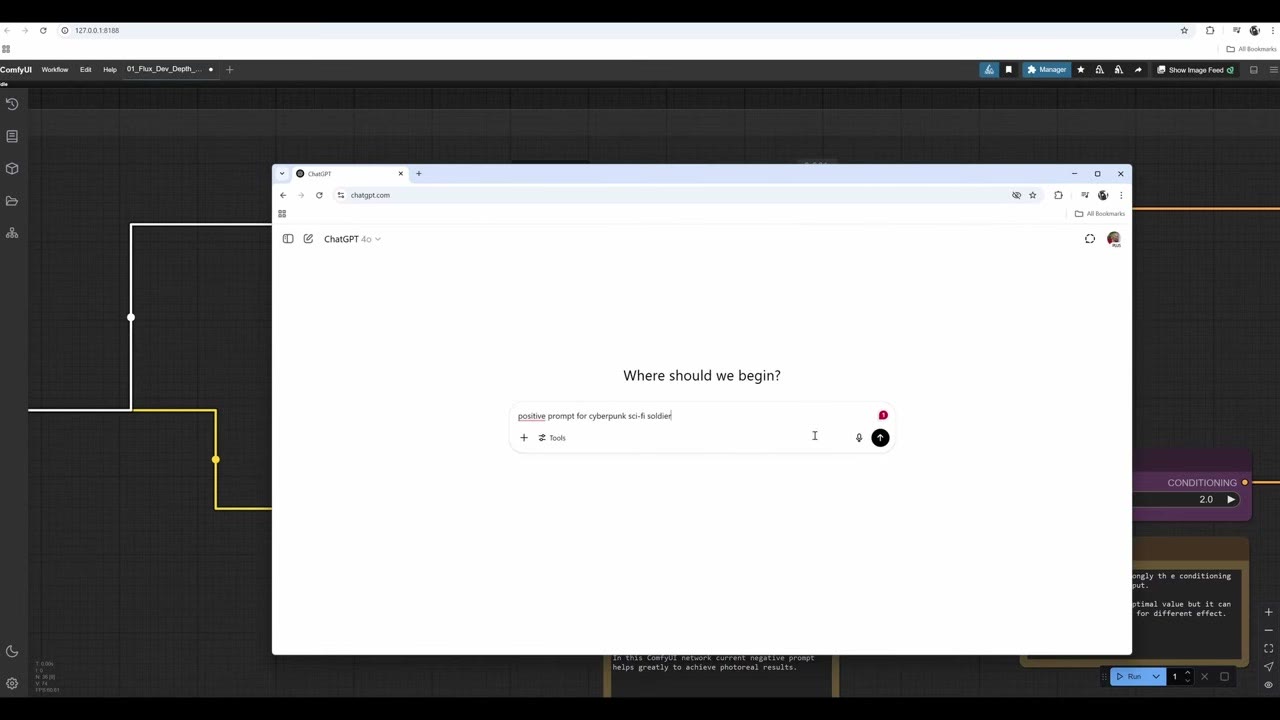
- Ask ChatGPT (or any chatbot) to expand the prompt. I asked for a positive prompt for a cyberpunk sci-fi soldier and pasted it in. Read it first and cut anything odd.
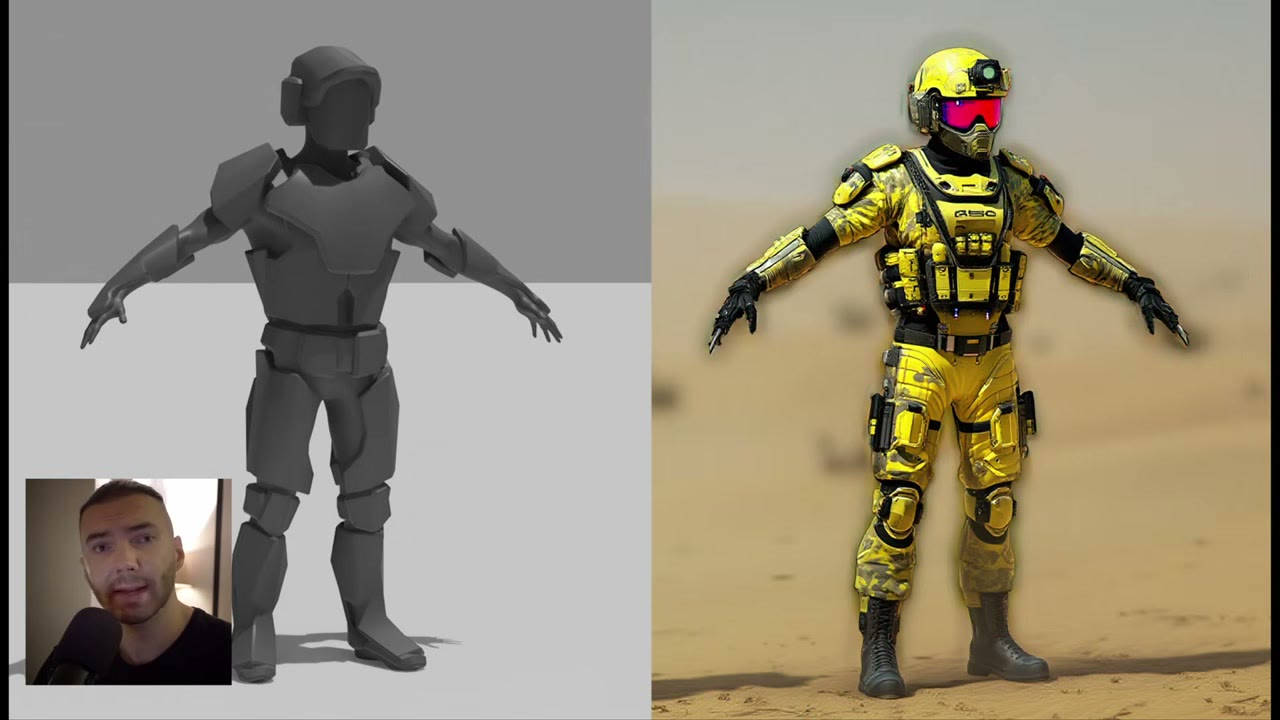
A note on that “copyright” text Flux sometimes adds in a corner: it isn’t anyone’s real copyright. Flux imitates images that often had text there.
Square images give the best results. I wanted landscape and portrait in this pipeline because many props are long or tall. Very wide images sometimes give the prop a thin outline or frame. You’ll see it in my results; square images have much less of it.
Stage 2: Prompt lists
Same depth setup, plus a Load Single Prompt From File node from the Inspire Pack, which reads prompts from a text file.
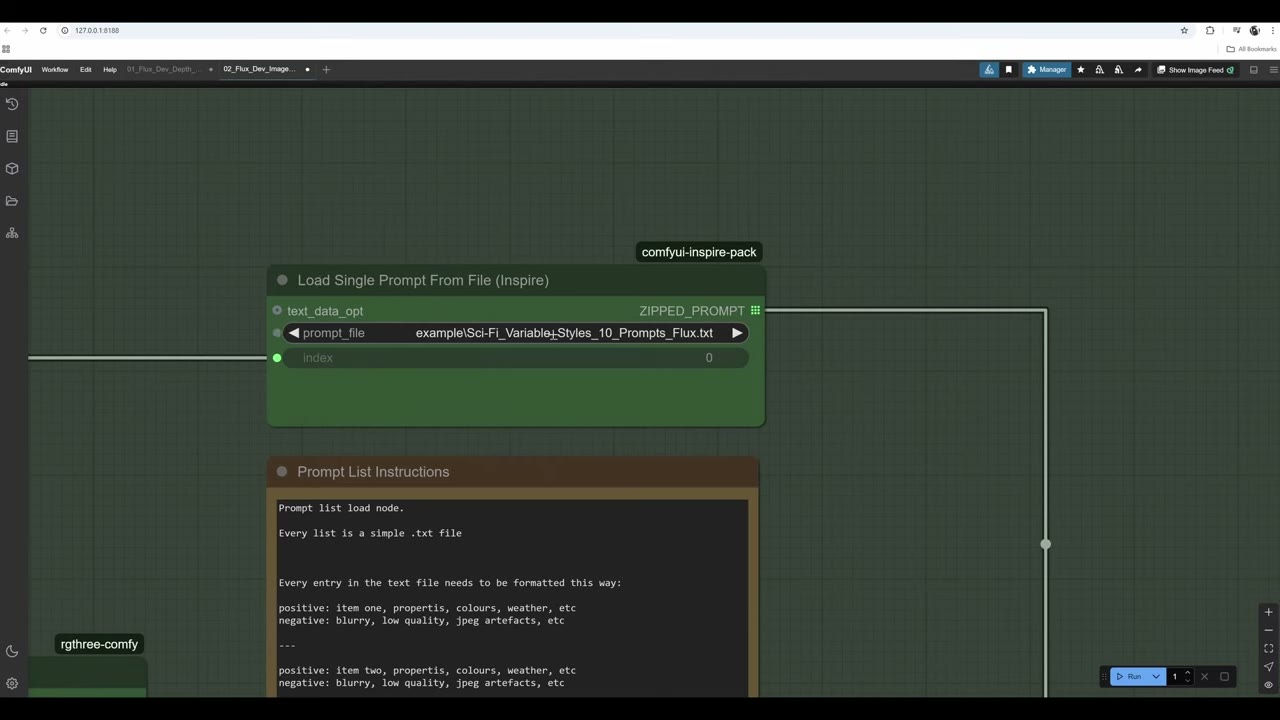
The format is strict:
positive: item one, properties, colours, weather, etc
negative: blurry, low quality, jpeg artefacts, etc
---
positive: item two, properties, colours, weather, etc
negative: blurry, low quality, jpeg artefacts, etc- Keep
positive:andnegative:lowercase. An uppercase letter in the wrong place makes the node read nothing. I keep everything lowercase to be safe. - The file has to live in
ComfyUI/custom_nodes/comfyui-inspire-pack/prompts/(I use theexamplesubfolder). You can’t point it anywhere else. - Keep count of your entries, because the node won’t tell you. Ask ChatGPT for exactly 10 entries in this format and it will give you a list like this.
- After editing a list, reload ComfyUI (Ctrl+R). If it still uses the old text, switch to another list, run once, and switch back.
My first list was called variable-styles-10-prompts: styles only, with no object described, so the same list works on any prop.
Wiring. The prompt goes through an Unzip Prompt node (it has to be unzipped). That node also needs some image connected to work, even though it doesn’t use it. Its own positive and negative text fields don’t add anything, so leave them alone.
Making it cycle. On its own the list only runs the first prompt. A loop counter from the WAS Node Suite feeds the index: increment 1, max = the number of prompts. A display node shows the index, which counts from 0 (prompt 1) to 9 (prompt 10). To start over, set reset to true, run once, set it back to false, and run again. A text preview node shows which prompt is running.
Stage 3: Prompt stacking
Prompt stacking builds one long prompt from several pieces with a text concatenate node: each input adds to the string. In my test:
- Text B: the style, from the prompt list (e.g. a sci-fi “ork” style).
- Text A: the subject, a long description of a military humanoid robot from ChatGPT.
- Text C: the background, a forest.
Put the most important part first. The text encoders give earlier words more weight, so the subject (a combat robot) goes before the style. That said, Flux follows the overall prompt pretty well.
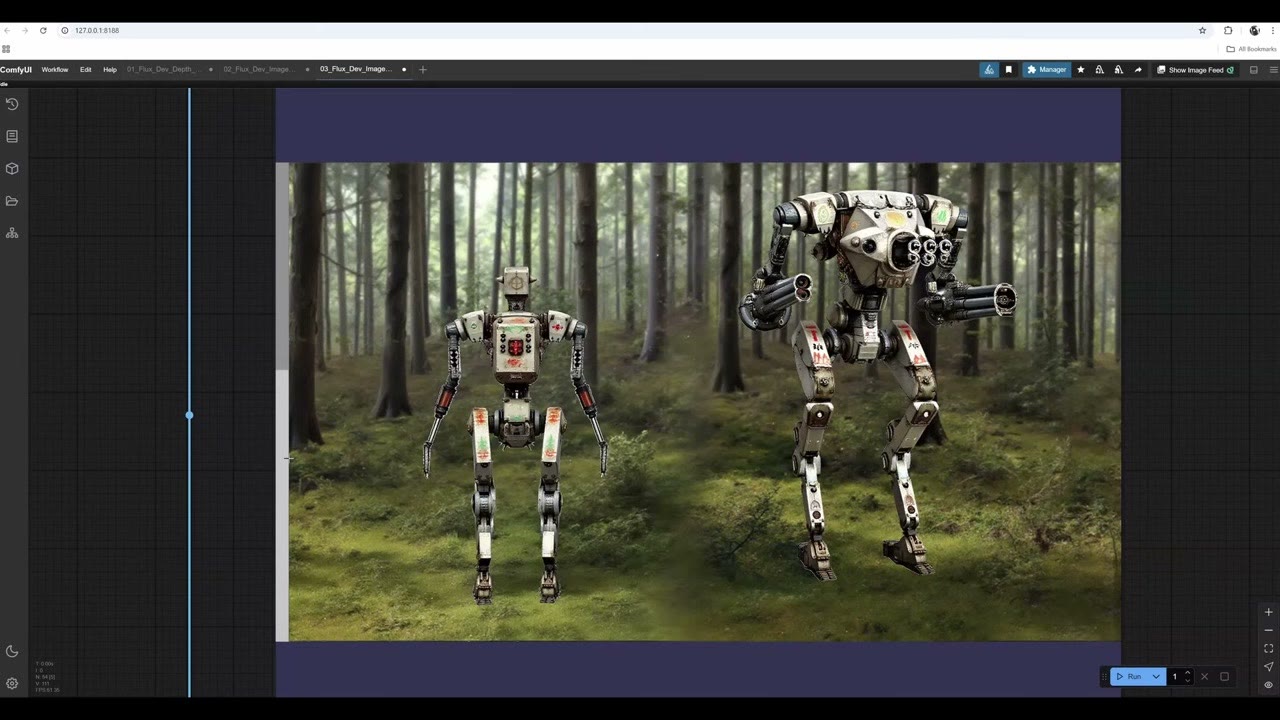
Not my best generation, but it follows the prompt. I’d run five or six more and pick the best, or lower the ControlNet strength for more freedom. Once you find a style you like, refine the prompt by adding and removing words.
Stage 4: A folder of screenshots, each with its own prompt
Now the screenshots come from a folder too, via Load Image Batch, and the same loop counter drives both the image index and the prompt index. Prompt 3 always goes with screenshot 3.
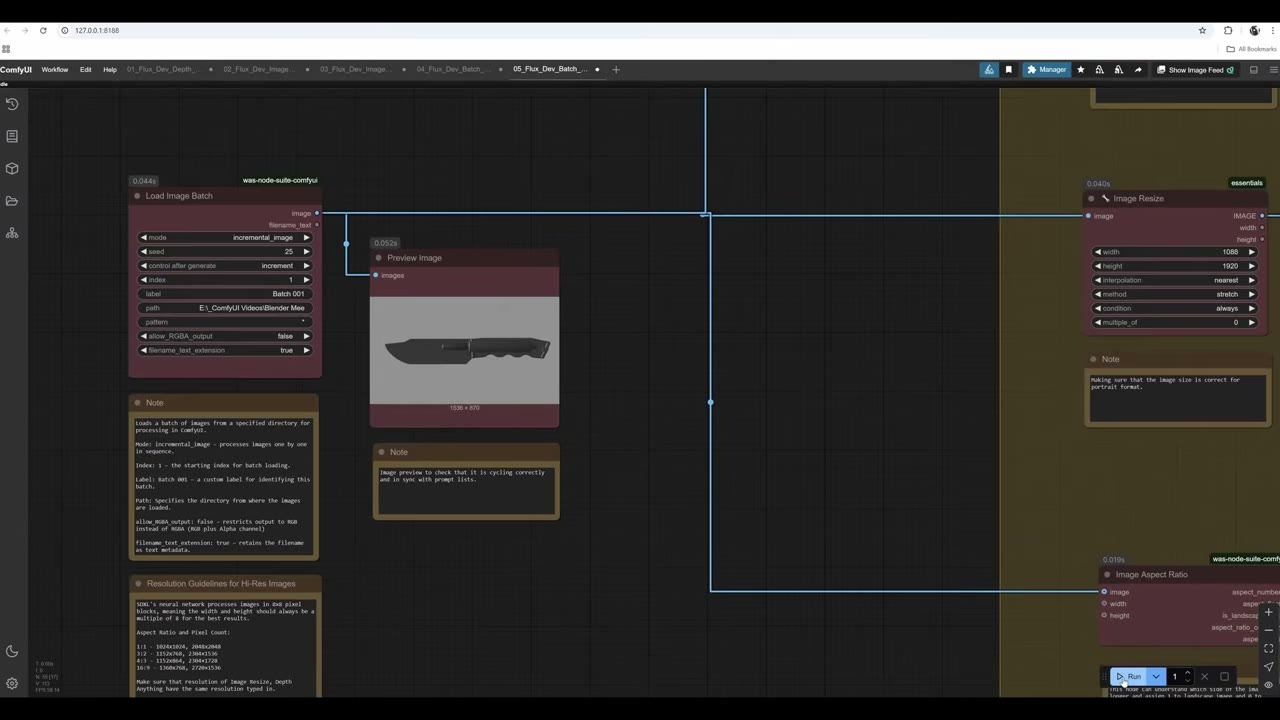
I had 18 screenshots and a sci-fi props prompt list with 18 matching descriptions: the rocket launcher is entry 1, the automatic rifle entry 2, and so on. Set the counter’s max to the number of screenshots (I’d left it at 10 by mistake; it should be 18). Use the image preview and the text preview to check that the description matches the screenshot.
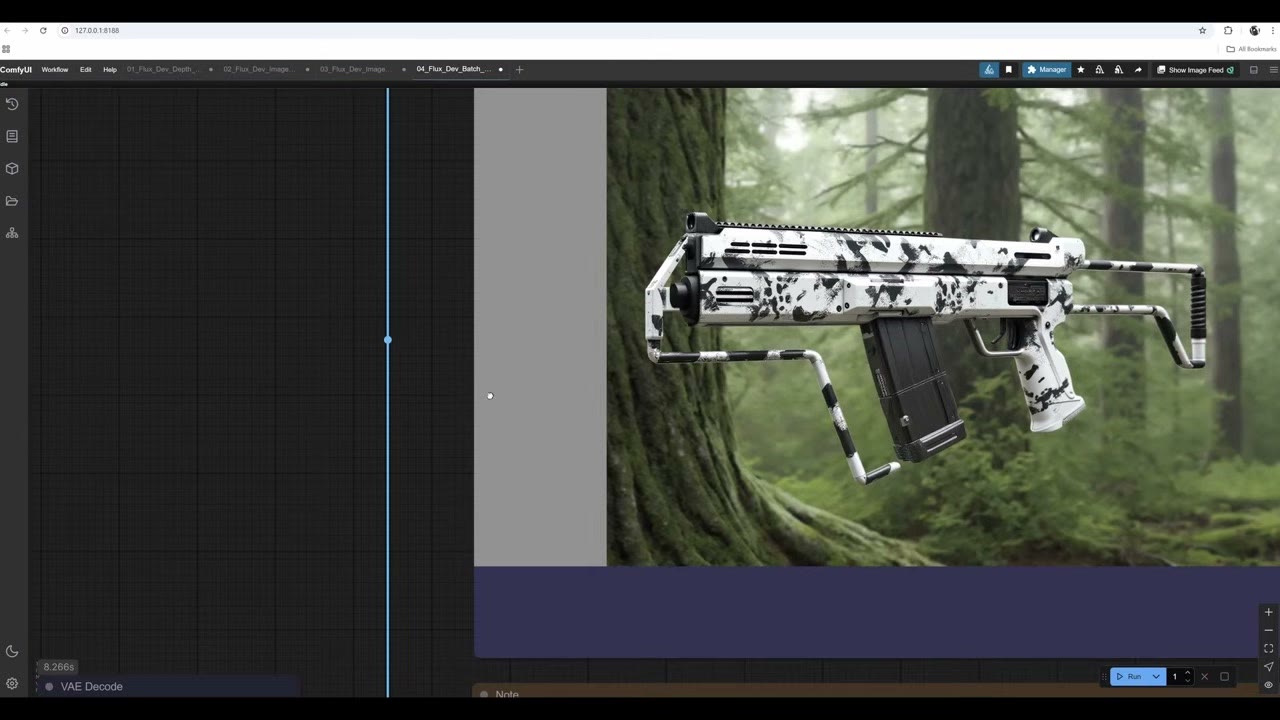
The submachine gun came out pretty nicely. It doesn’t fill the frame, but the handles and many of the parts are high quality. This stage has no portrait/landscape sorting, so portrait screenshots get stretched. If all your images are landscape, or all square, this simpler workflow is enough. I use simpler workflows for a lot of jobs.
Stage 5: Sorting landscape and portrait automatically
To mix tall and wide props, the workflow has to detect each image’s orientation and size the canvas to match. I built two versions.
The image switch (easier to read). Each image is resized both ways, to landscape and to portrait. An image aspect node from the WAS Node Suite outputs 1 for landscape and 0 for portrait, a small node converts that number to true/false, and an image input switch picks the correctly resized image. The size then goes to the Empty Latent Image. The downside: you resize every image twice and hold both in memory.
The number switch (what I use). Instead of switching images, it switches the numbers: two number input switches, one for width and one for height, driven by the same true/false value. Landscape picks 1920 × 1088; portrait picks 1088 × 1920. It’s faster and very robust, though harder to follow. Even I struggle to read it after a few days away, which is partly why I recorded this video.
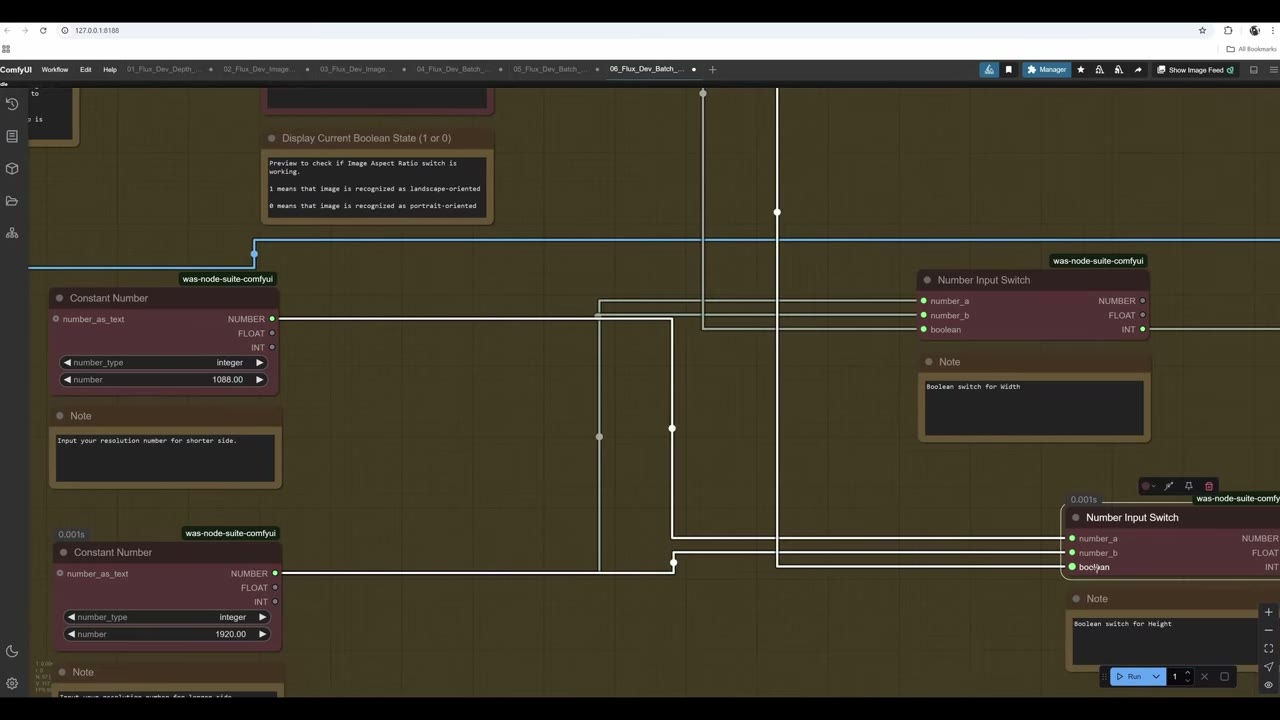
There’s a separate guide that explains this sorting trick on its own: sorting images by aspect ratio in ComfyUI.
The full pipeline
The complete workflow combines all of it: depth mapping, the number-switch sorting, the screenshot folder with its prompt list, and a second prompt list for styles. Each part is simple; together they’re hard to follow, which is why I built them up separately.
With two loop counters you can multiply the variations. My props loop ran over 18 screenshots, and a colour list with 54 entries (18 blue, 18 green, 18 white) ran alongside it, so every prop got rendered in every colour. Other materials work too: stainless steel, carbon fibre, “3D printed” (which came out looking like plastic). To change a list, paste it into ChatGPT and ask, for example, to change white to black. It keeps the format.
On top of that come a free-text style field (camouflage, chequered patterns, anything) and a background field.
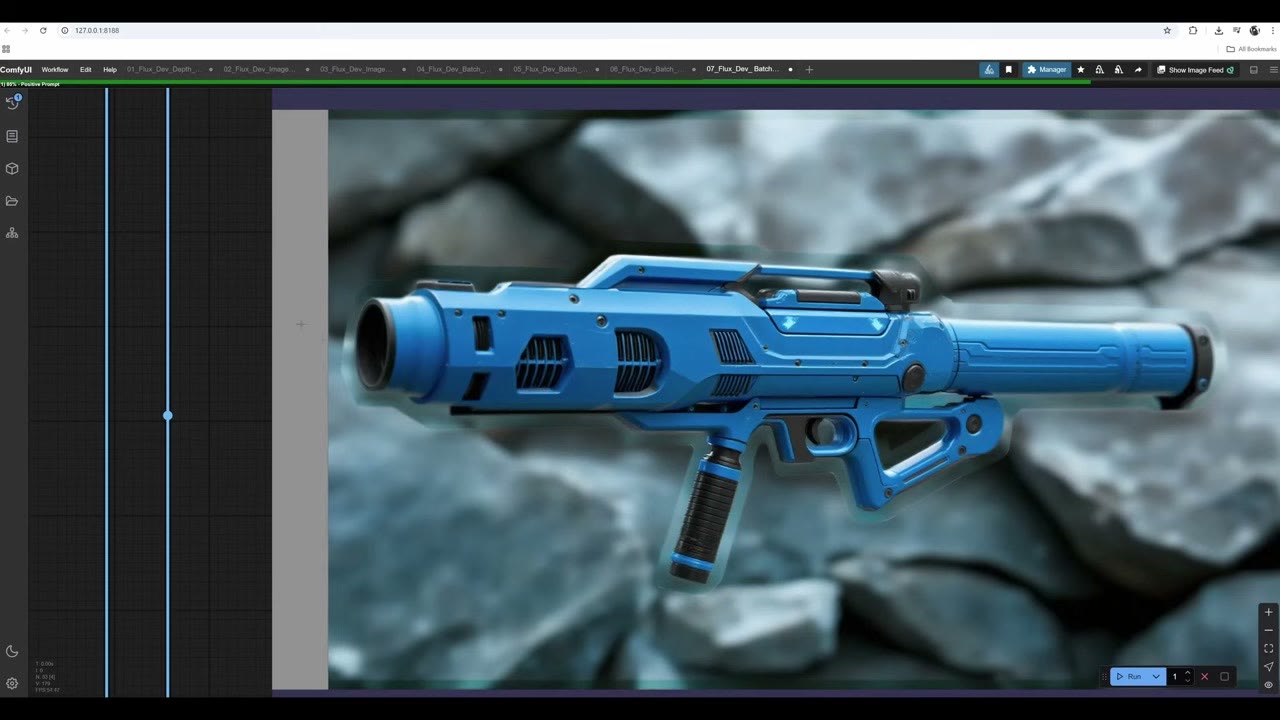
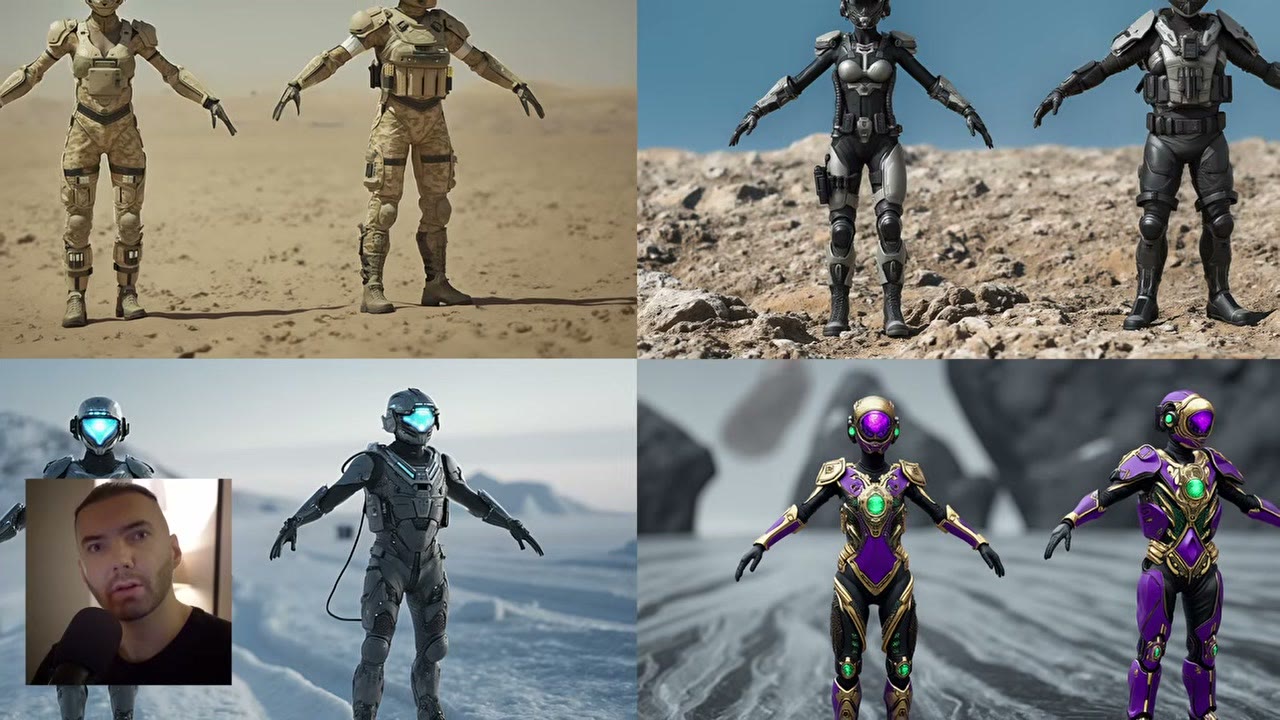
Using it day to day:
- Change the folder path to your screenshots and the prompt list to match.
- Set the counters: with 10 screenshots and 3 colours, the style counter goes to 30. Run it overnight with ten colours and materials and you get 100 ideas by morning.
- Set the width and height values, including on the depth node, for square or smaller images. The workflow has notes listing good sizes.
- To reset everything, set both loop counters’ reset to true, run, then set both to false and run again. Jumping to a specific prompt mid-list is tricky; to work on one prop, I use a simpler workflow with just that image and the prompt list.
Speed: on my RTX A5000 with 24 GB of VRAM, an image takes about 160 seconds (300 when other models had to load first). That’s a fair amount of time, and why I was looking to upgrade.
Where to run it
You need at least 12 GB of VRAM for Flux. On a smaller card, use the GGUF model, or run it on a rented GPU; I later moved this kind of work to RunPod, as described in my introduction to RunPod.
The RunComfy link above is a referral link, as is my RunPod referral link: new RunPod accounts that sign up with Google get $5–$500 in credit after their first $10, and I get a small commission.
Watch the video version (29:54)
Everything above is in the video too, if you'd rather follow along on screen.
FAQ
What GPU do I need for this pipeline?
At least 12 GB of VRAM for Flux. On lower VRAM, use the GGUF version of Flux with a GGUF loader: the quality doesn’t suffer much. On my 24 GB RTX A5000, one image took about 160 seconds.
What ControlNet strength should I use for 3D blockouts?
About 0.7 with Flux; between 0.6 and 0.8 works. At 1.0 the image glitches out. With SDXL I go lower, to around 0.5.
Why does my prompt list only run the first prompt, or not update?
A prompt list needs an index from a loop counter to cycle. If you edit the text file, reload ComfyUI; if it still uses the old text, switch to another list, run, and switch back.
Why do my wide images have a thin outline or frame around the prop?
It comes from the very wide, non-square format. Square images give the most predictable results, but long props like rocket launchers need wide images. For concept art it rarely matters.

Anton Tenitsky is a 3D artist with 15+ years in computer graphics, working with Nickelodeon, Gameloft, Marvel Rivals and many other clients. More about me